Installation
Currently, to make full usage of our TePhOS release, you will need the Grommy2 device installed in your Texas Instruments TI-99/4(a) Home Computer replacing the original 3 console GROM’s installed in your motherboard.
Installation is easy, as it only requires opening up your console, removing the shield, and removing the 3 console GROM’s which are in sockets, and plugging in the Grommy2 device.
To make full usage of our TePhOS release, it is also recommended to solder two wires to from the Grommy2 PCBoard to your console’s motherboard, this enables the automatic usage of Review Module Library and the feature that banks the 4 blocks of 24k of GPL memory space, as the Grommy2 allows for up to 96k of new GPL (Graphics Programming Language) coding, compared to the original TI99 OS which only had 18k of space.
(All the photos below, can be expanded for clearer details, by clicking on them!)
There is two ways to do so, loading and running the “diskette” 90k floppy image contained in our released zip file from the downloads page, or via the “binary cartridge” image using a cartridge device like Flashrom99 or FinalGrom99 to run the upgrader. This only has to be done once program the Grommy2 device fully with our TePhOS 9t9 firmware, or for all future upgrades.
PLEASE NOTE: – Currently, our installation program makes use of the 32k Expansion Memory, once the progress is completed and all four banks are programmed with our TePhOS release, you no longer require the 32k to run our new “operating system”, but really without having expanded memory on your TI99 system, it is not very enjoyable. 🙂
Installation is easy, as it only requires opening up your console, removing the shield, and removing the 3 console GROM’s which are in sockets, and plugging in the Grommy2 device.
To make full usage of our TePhOS release, it is also recommended to solder two wires to from the Grommy2 PCBoard to your console’s motherboard, this enables the automatic usage of Review Module Library and the feature that banks the 4 blocks of 24k of GPL memory space, as the Grommy2 allows for up to 96k of new GPL (Graphics Programming Language) coding, compared to the original TI99 OS which only had 18k of space.
PART 1 – HARDWARE INSTALLATION
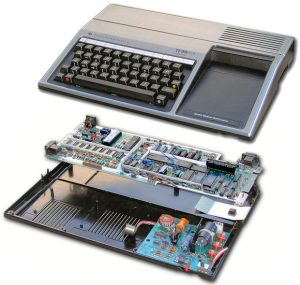
- CONSOLE DISASSEMBLY The first step you need to do is take-apart your beloved TI99 console, so you can reach the motherboard. There is already a great guide on how to do this via Mainbyte or ArcadeShopper, so just click on the picture below and follow the steps to fully disassemble your console.
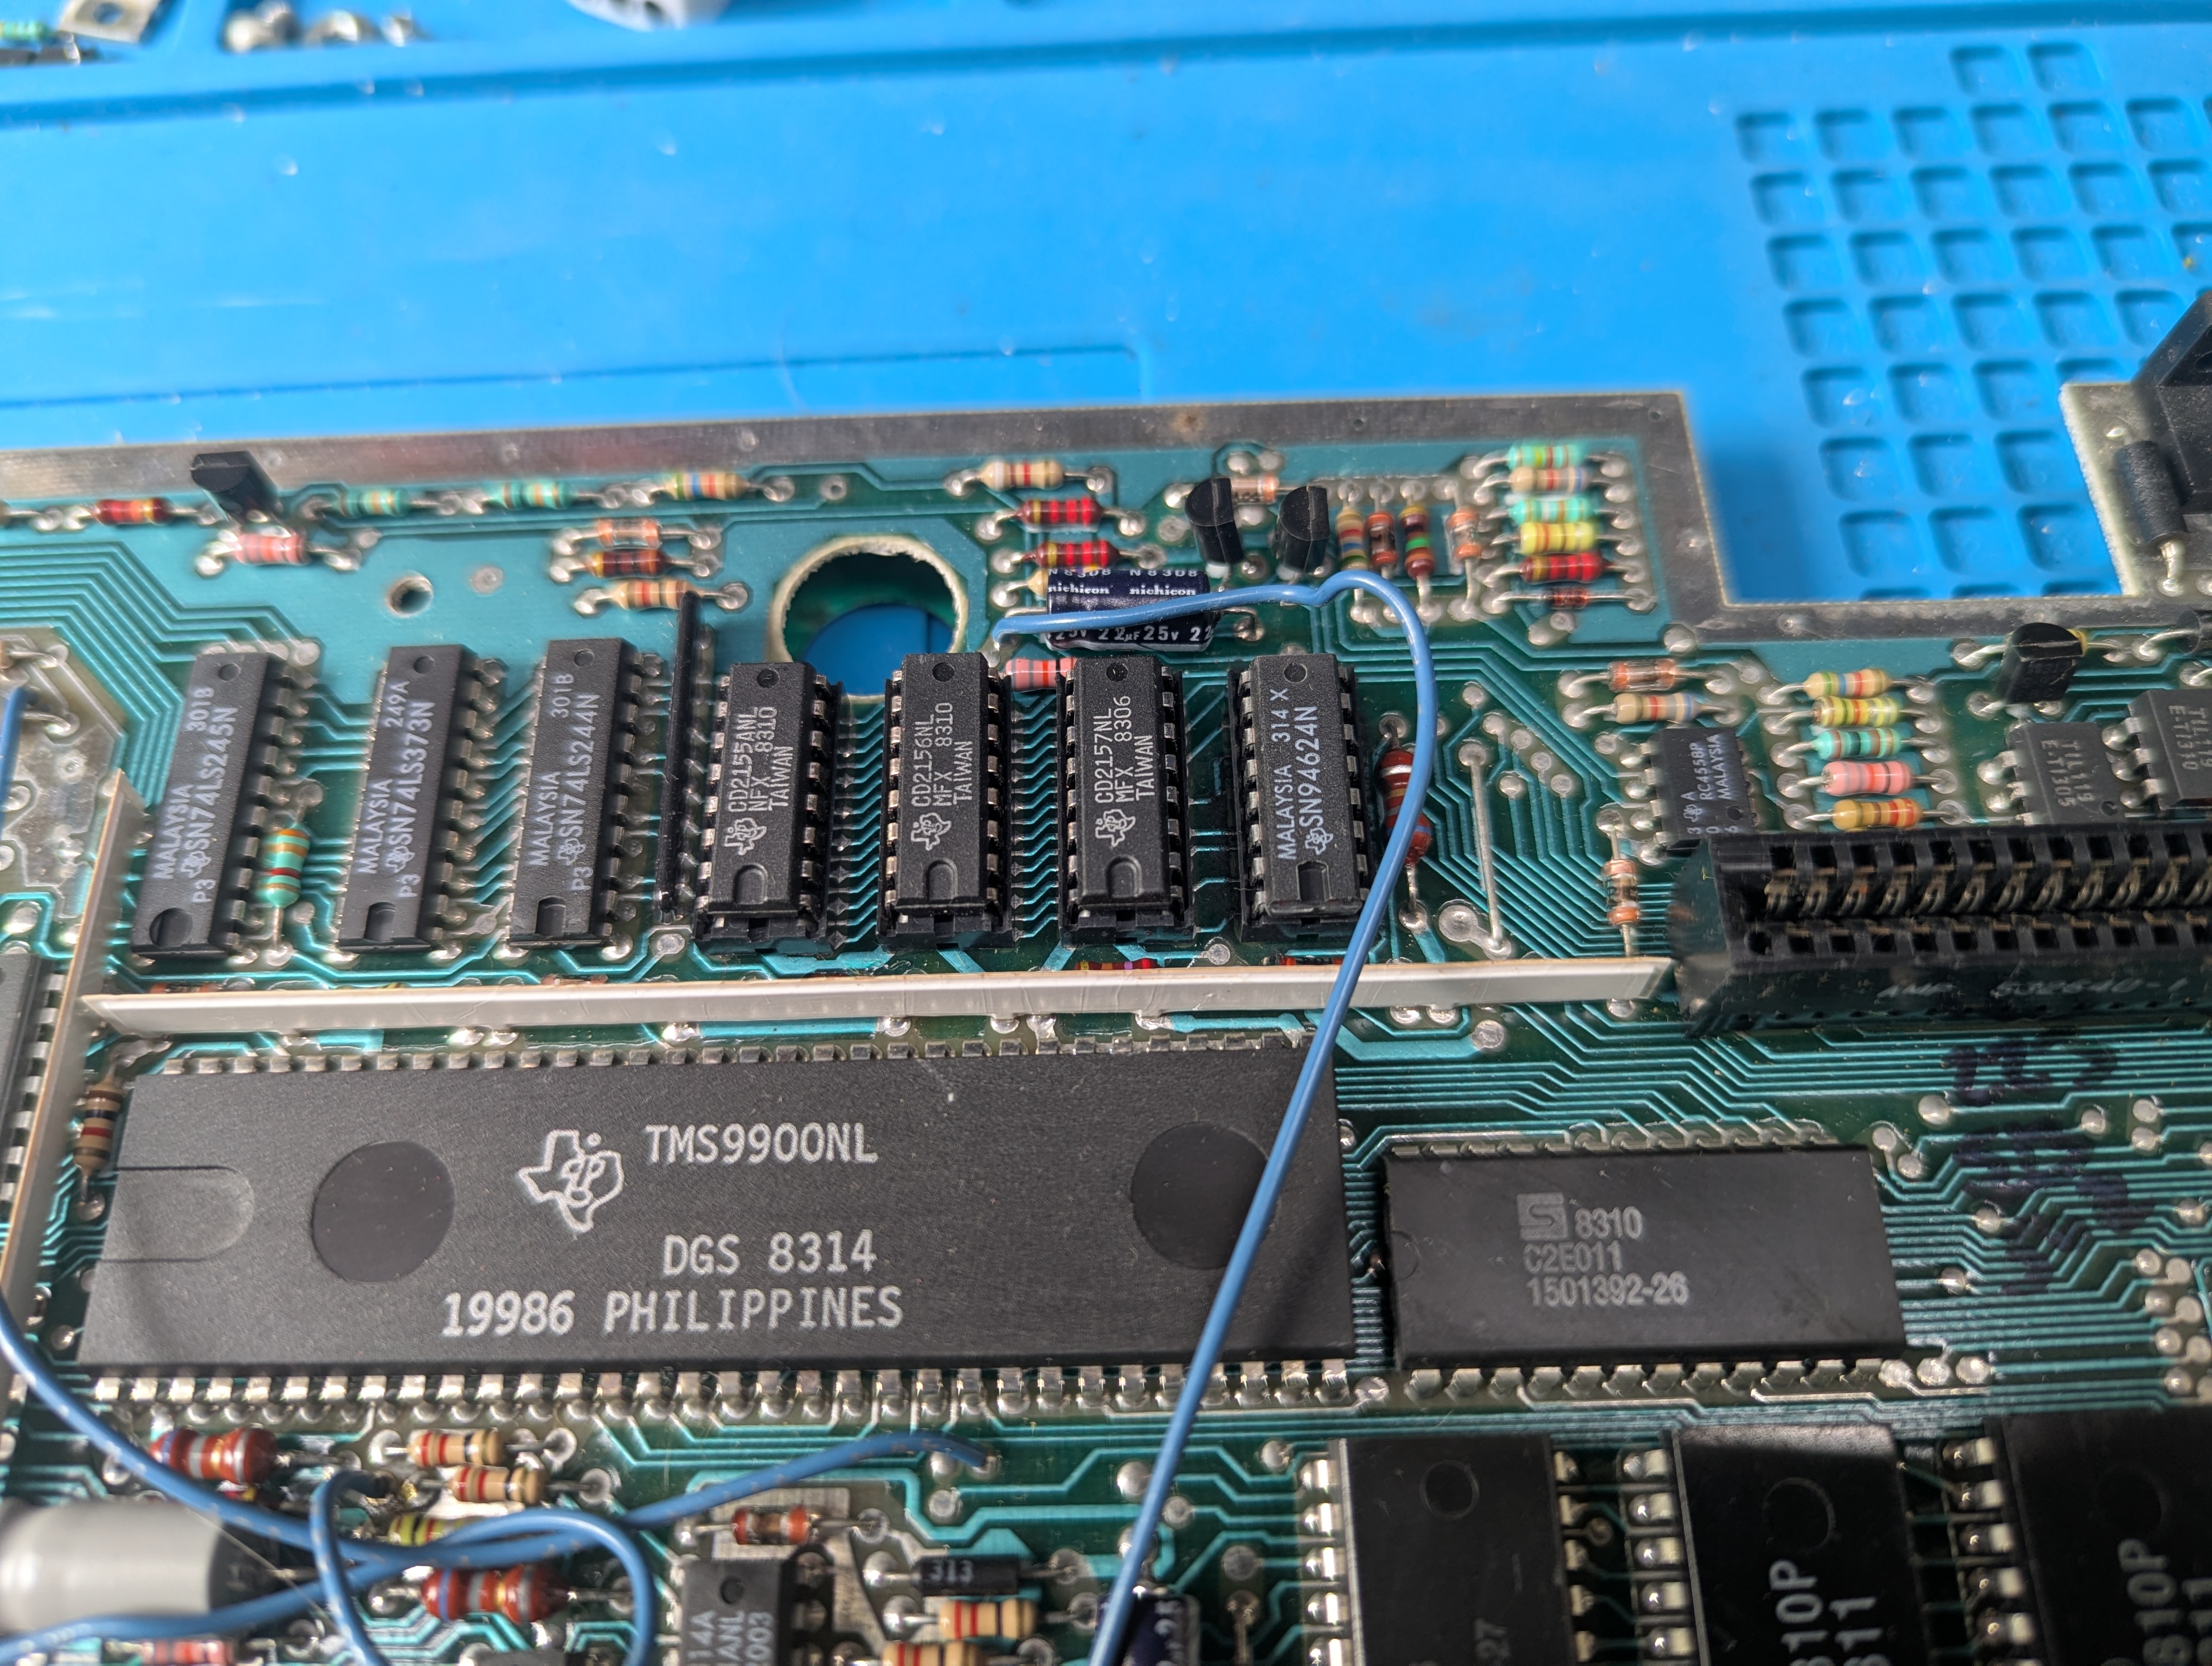
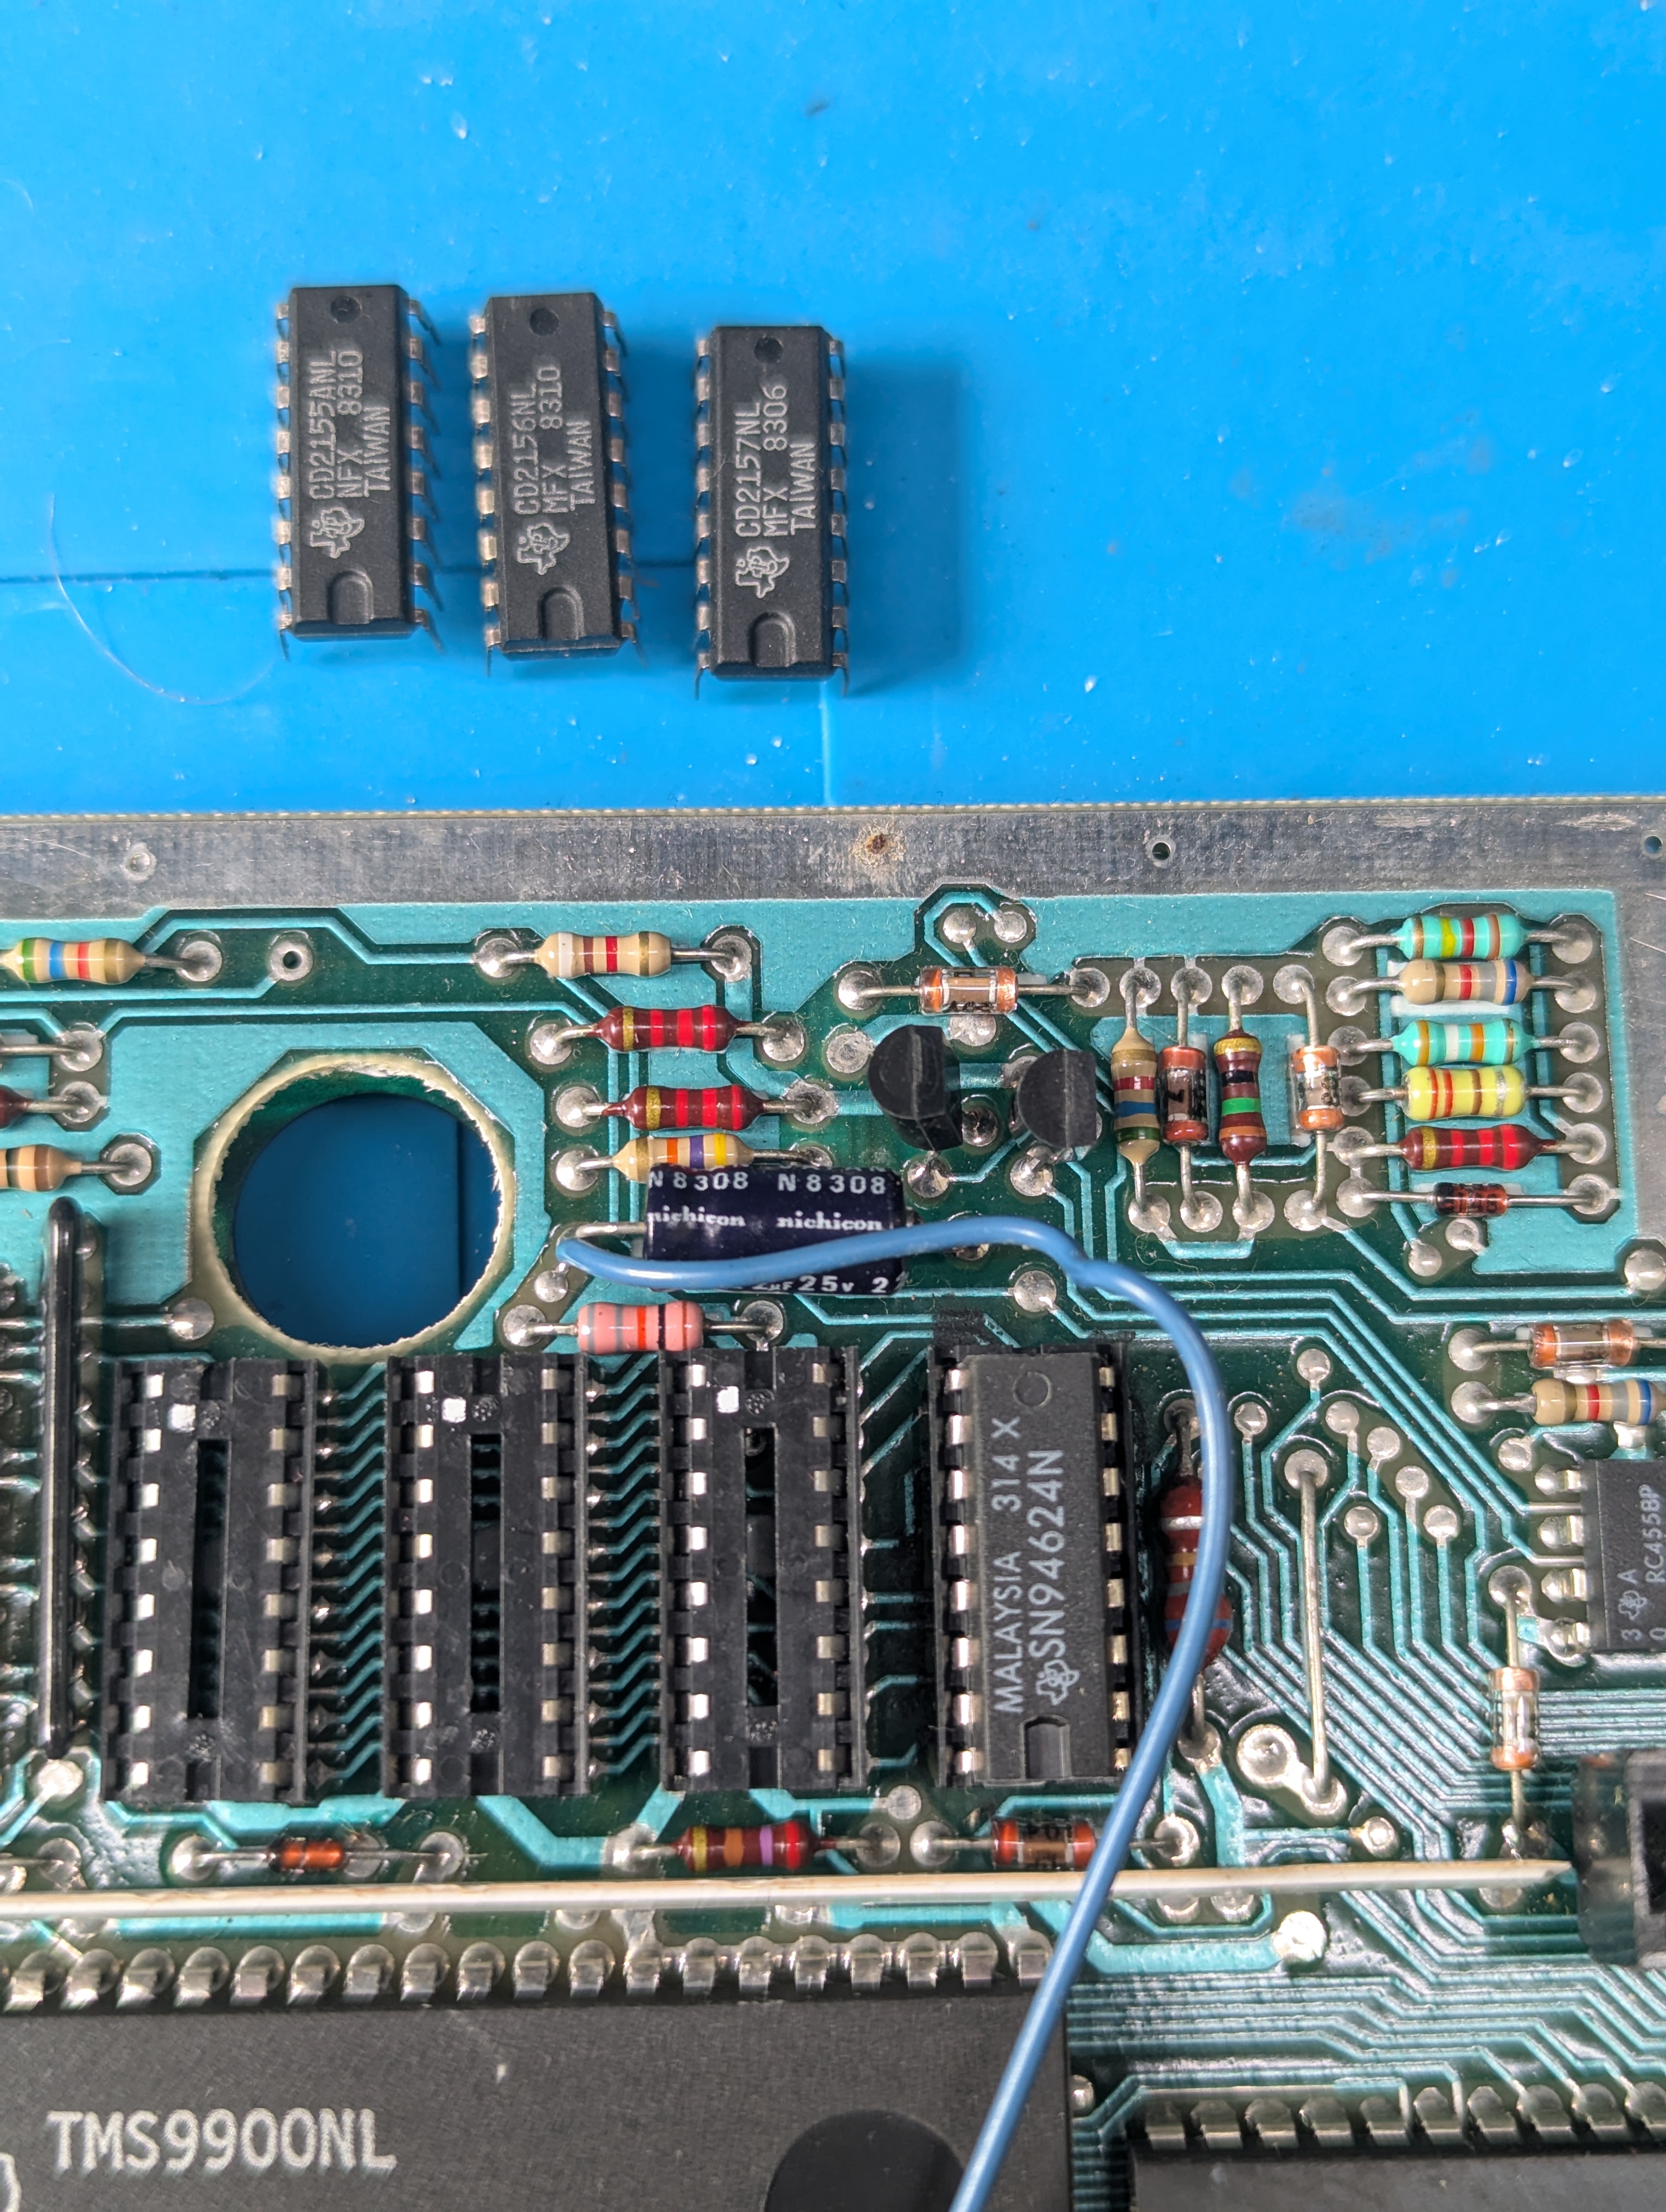
- ORIGINAL GROM REMOVAL The second step is the removal of all 3 console GROM’s on your TI99 motherboard, shown below is a picture of the 4A motherboard with the 3 GROM’s still in their socket on the left, and then a second picture on the right showing them all nicely removed. PLEASE NOTE: If you have the new QI motherboard revision, or the original 4 motherboard, the 3 chips are most likely NOT in sockets, and you will need to, sadly, de-solder them first and install sockets. 🙁
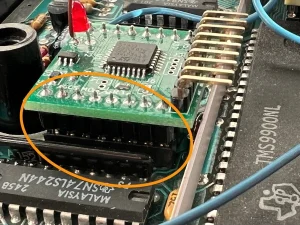
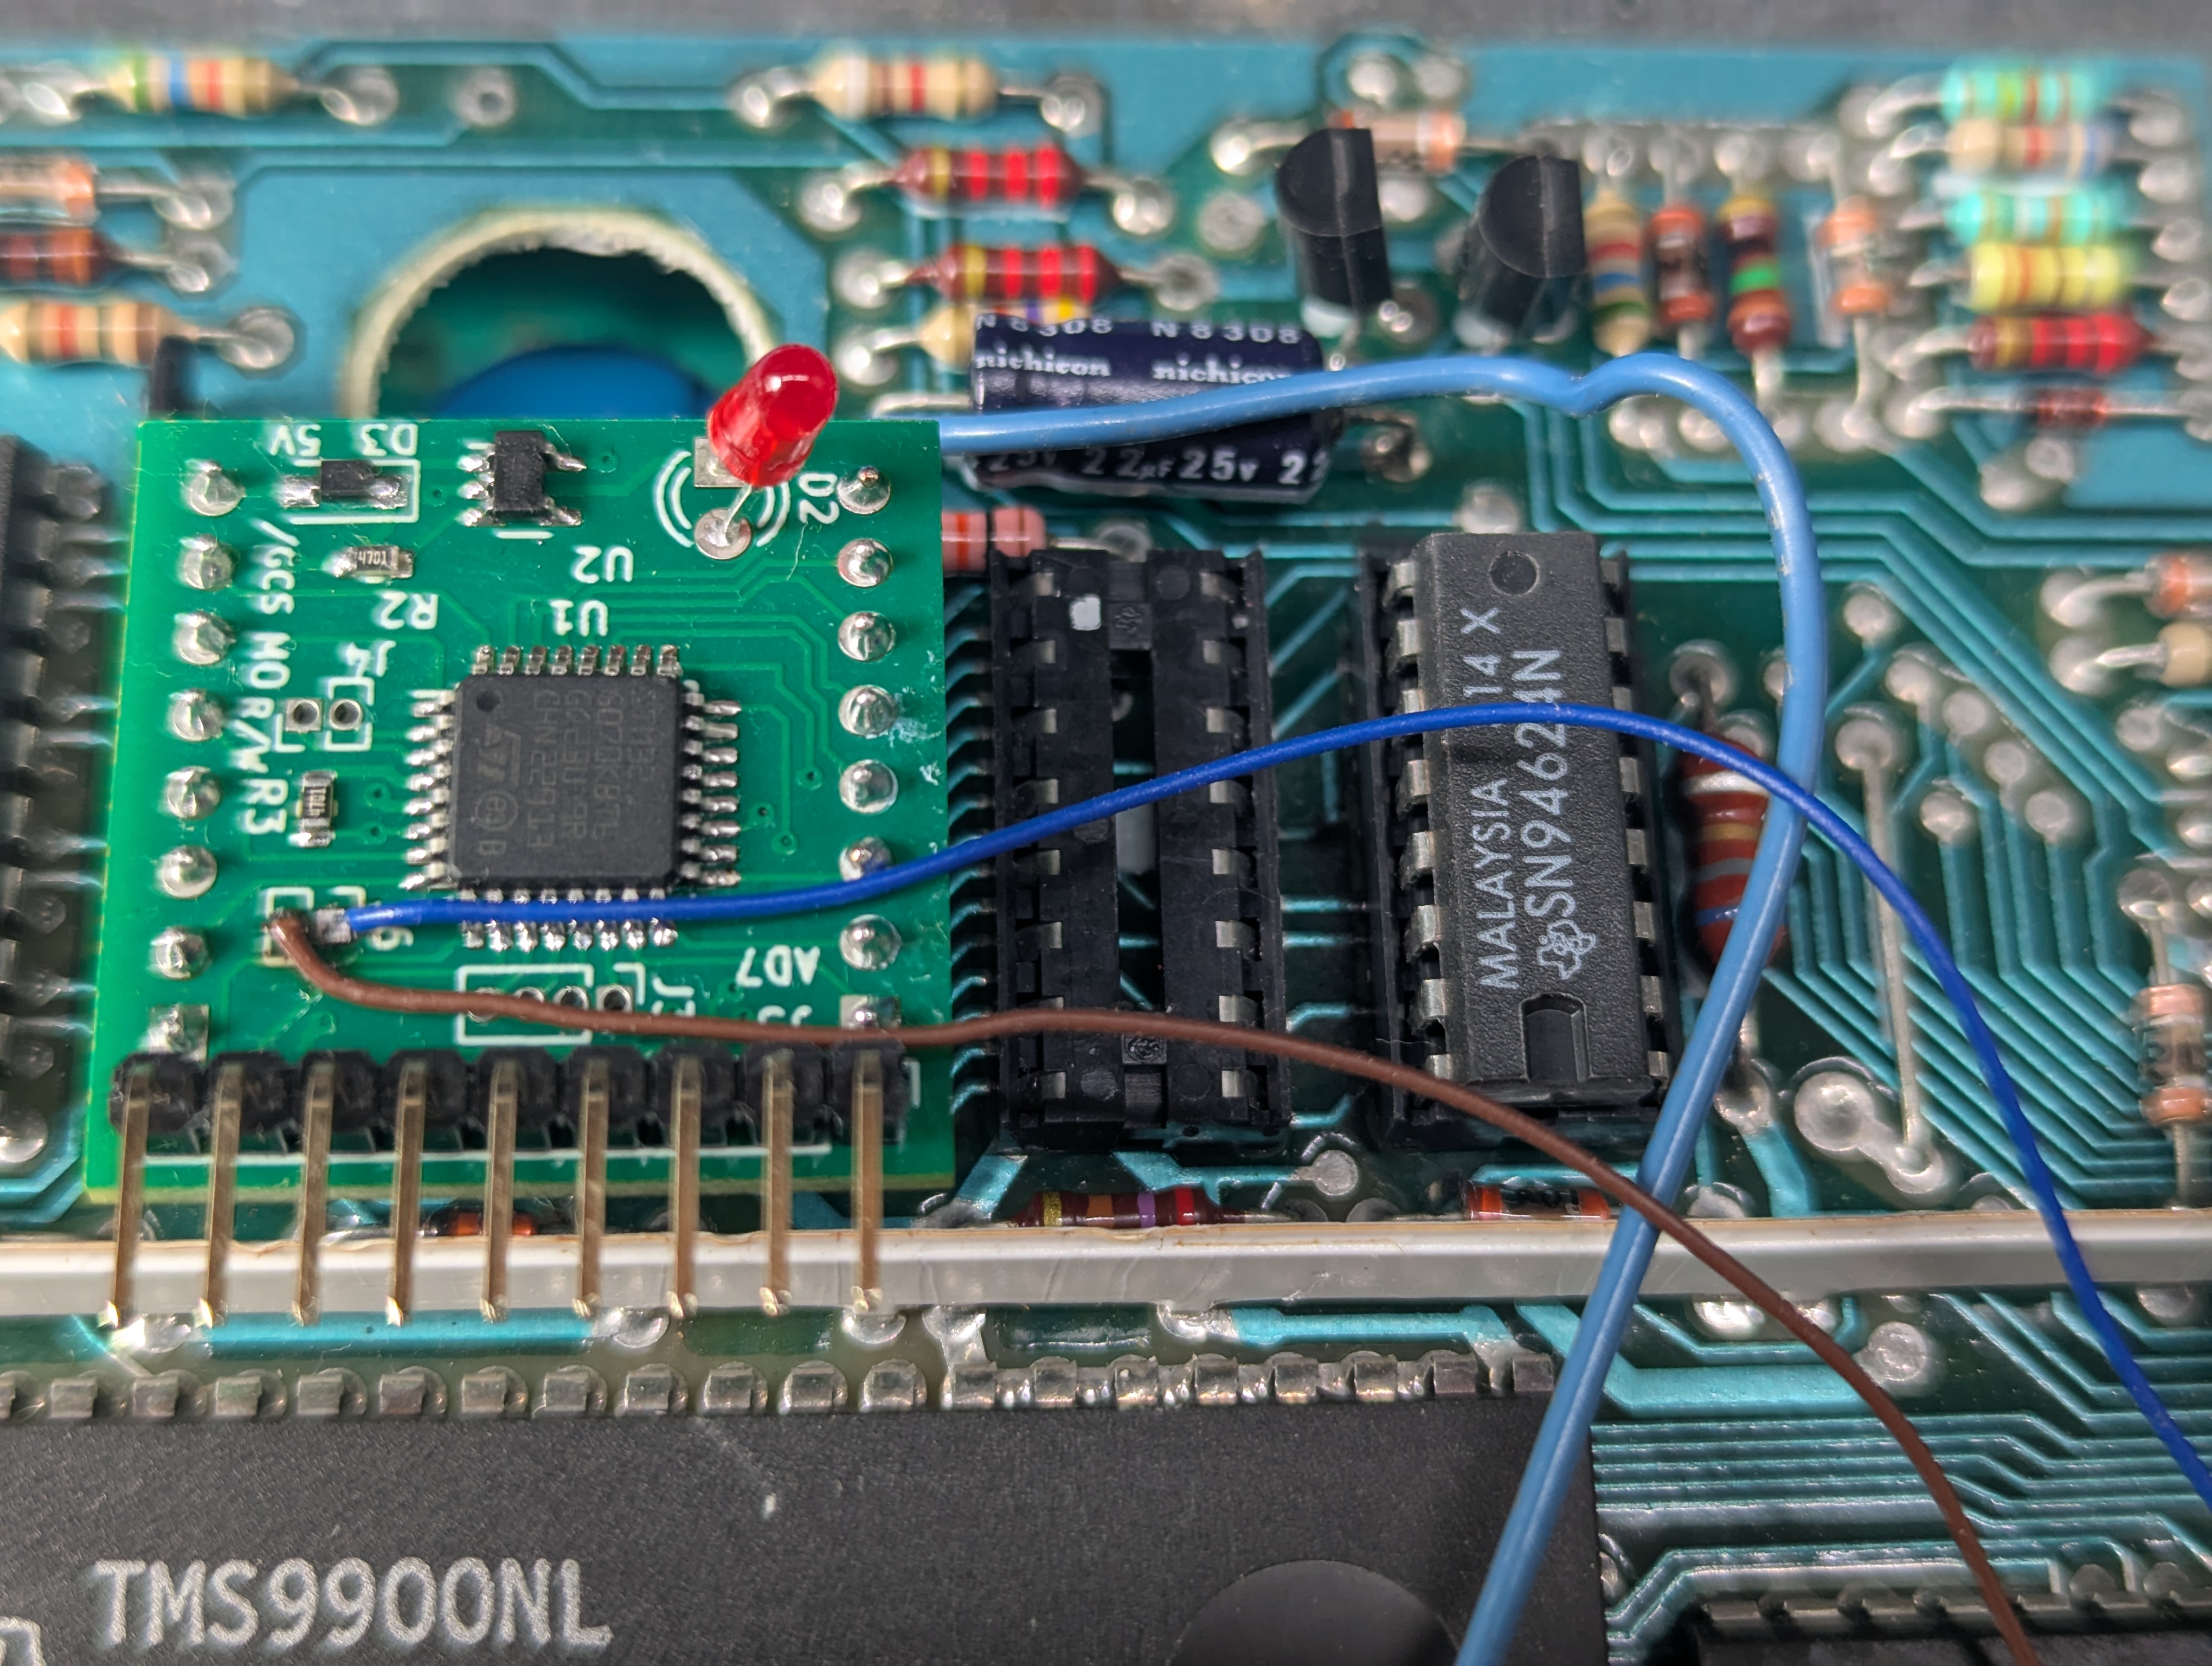
- INSTALL GROMMY2 DEVICE The third step is to plug in your Grommy2 device into the now empty sockets, take a look at the two pictures below, you can see that the unit sits nicely across two of the sockets (making sure both sides are pushed firmly into the two sockets, and pin 1 of the Grommy2 is pin 1 of the Grom socket, as shown) leaving one socket totally empty.
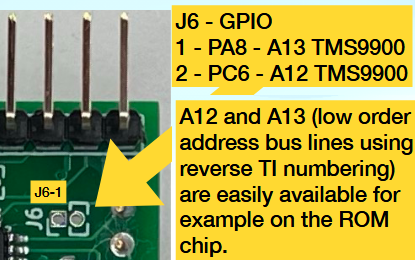
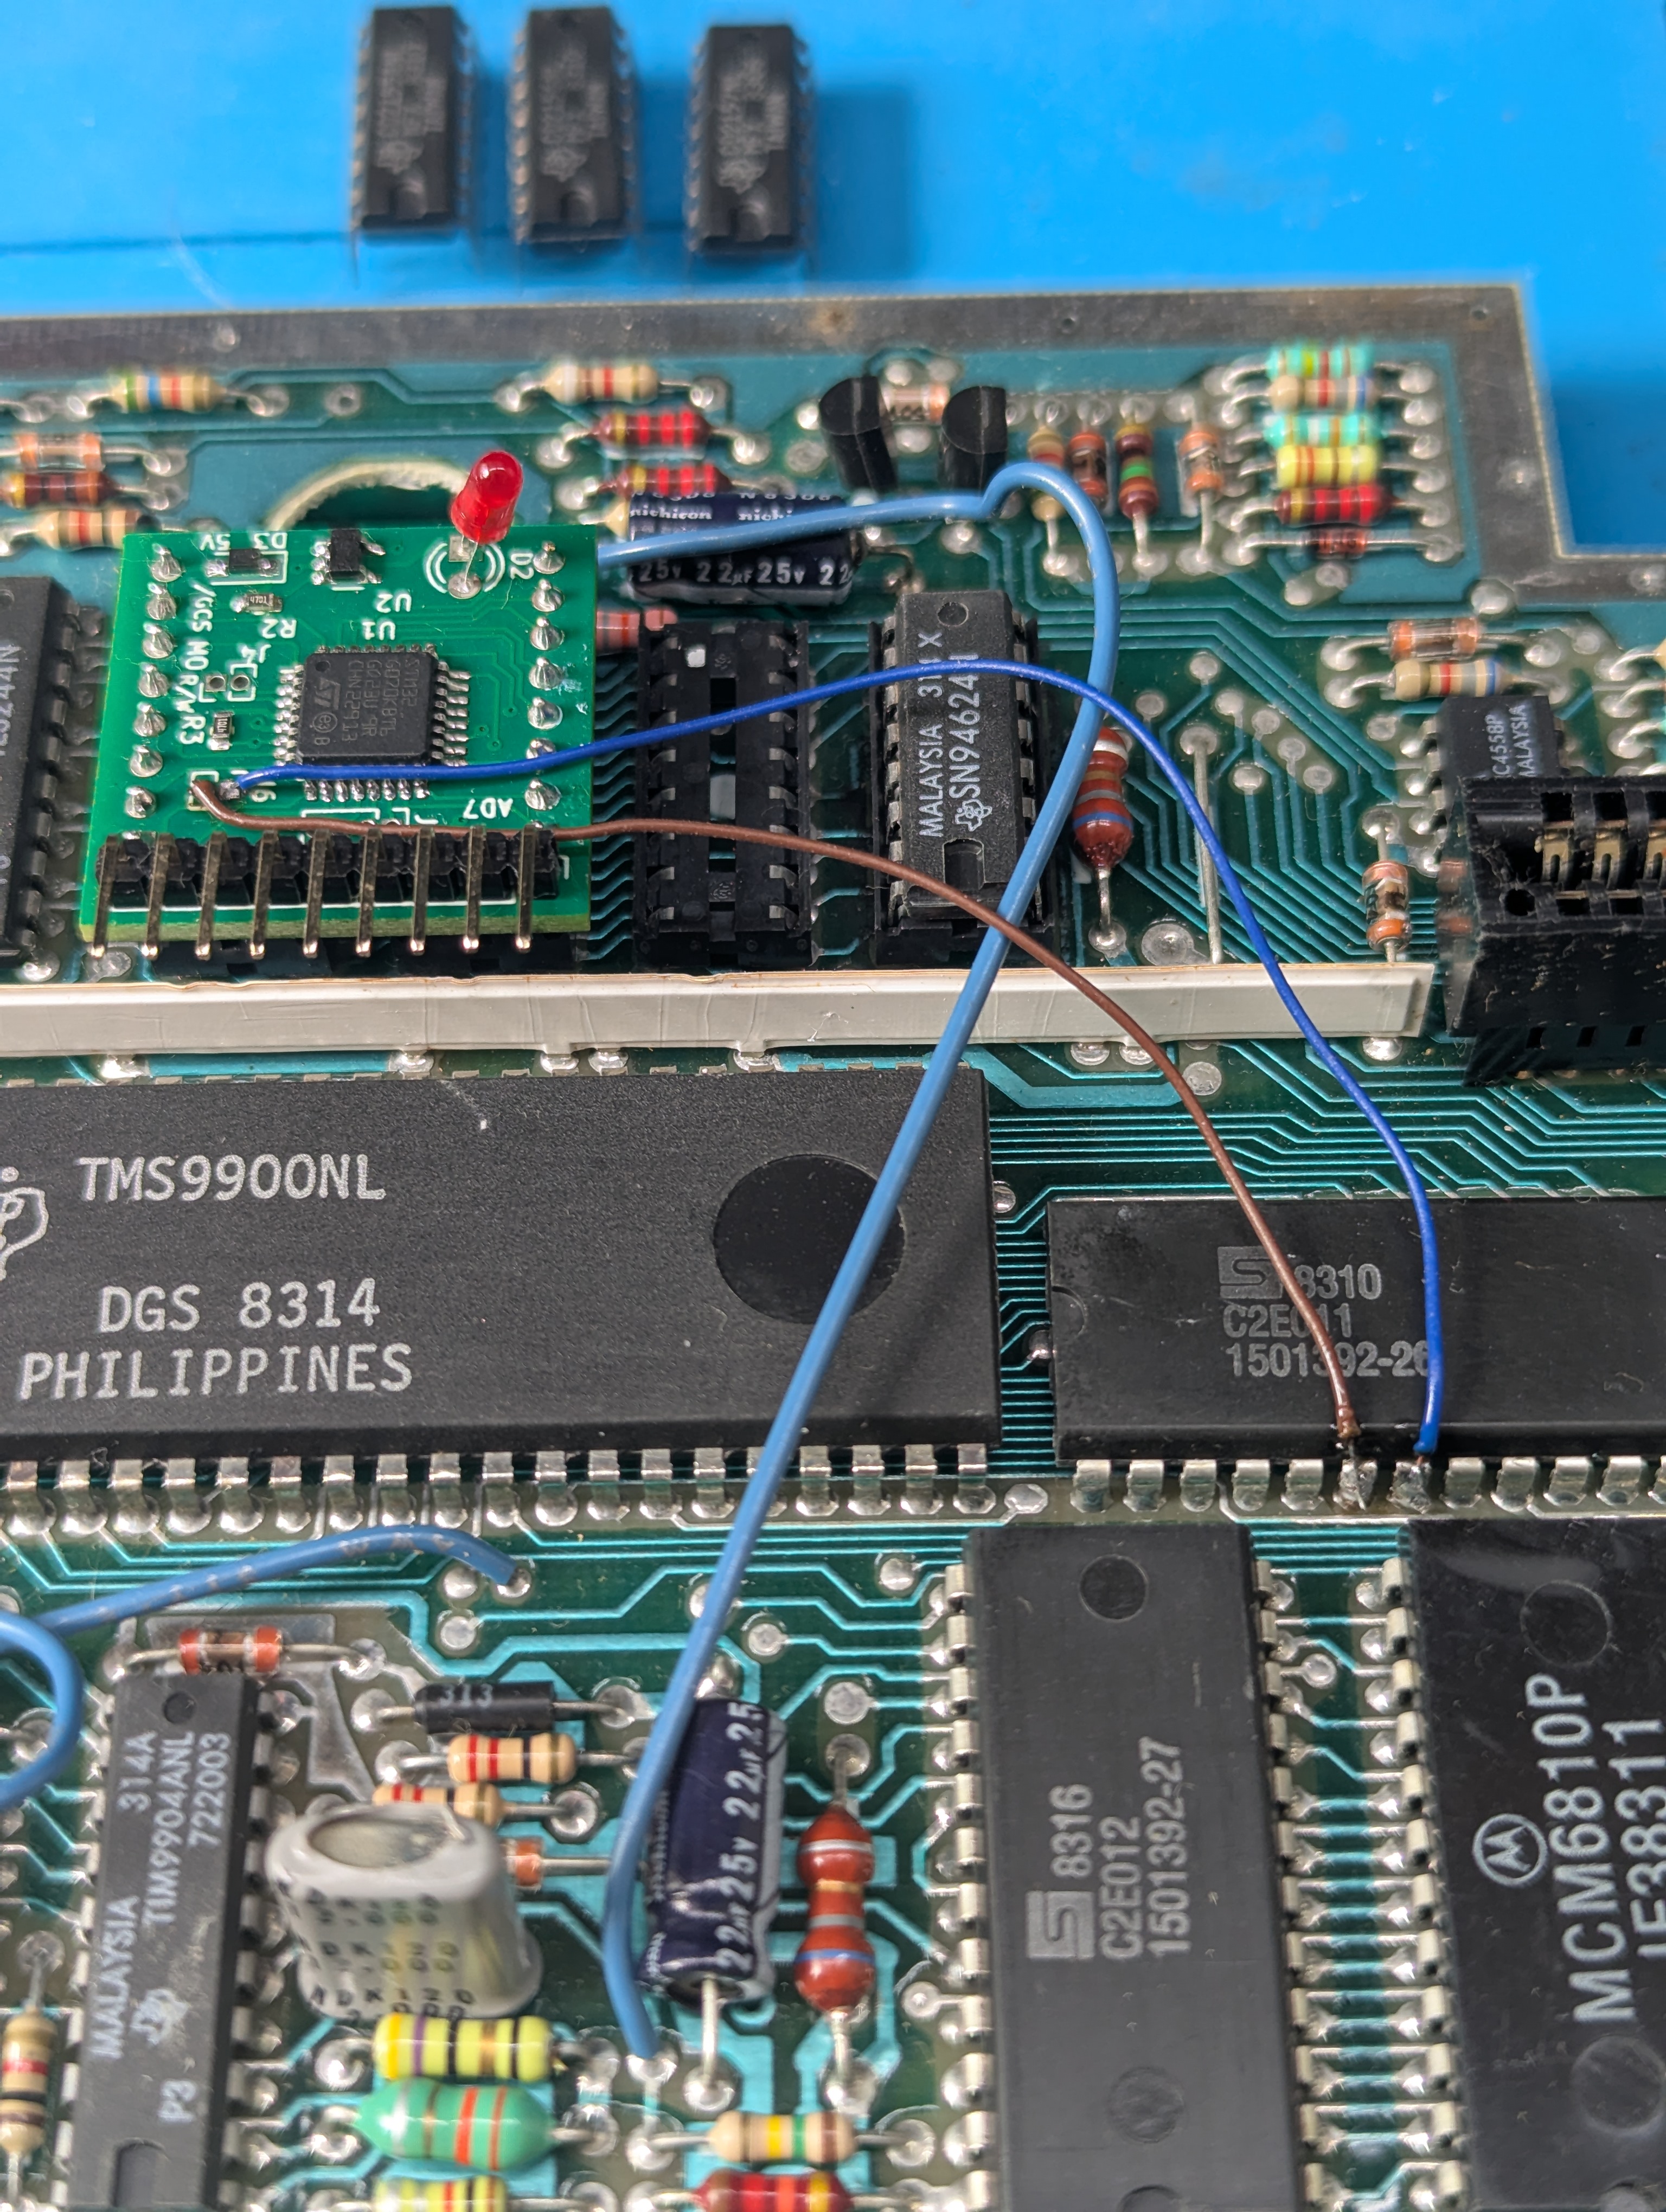
- EXTRA ADDRESS LINES The fourth step is solder two jumper wires from the Grommy2 device to the required TMS9900 address lines on a chip nearby. In the following pictures below, you will see that the BLUE wire is connected from ROM A1 pin #7 (A13 = 9900) to #J6-1 (PA8), and the BROWN wire is connected from ROM A2 pin #6 (A12 = 9900) to #J6-2 (PC6).
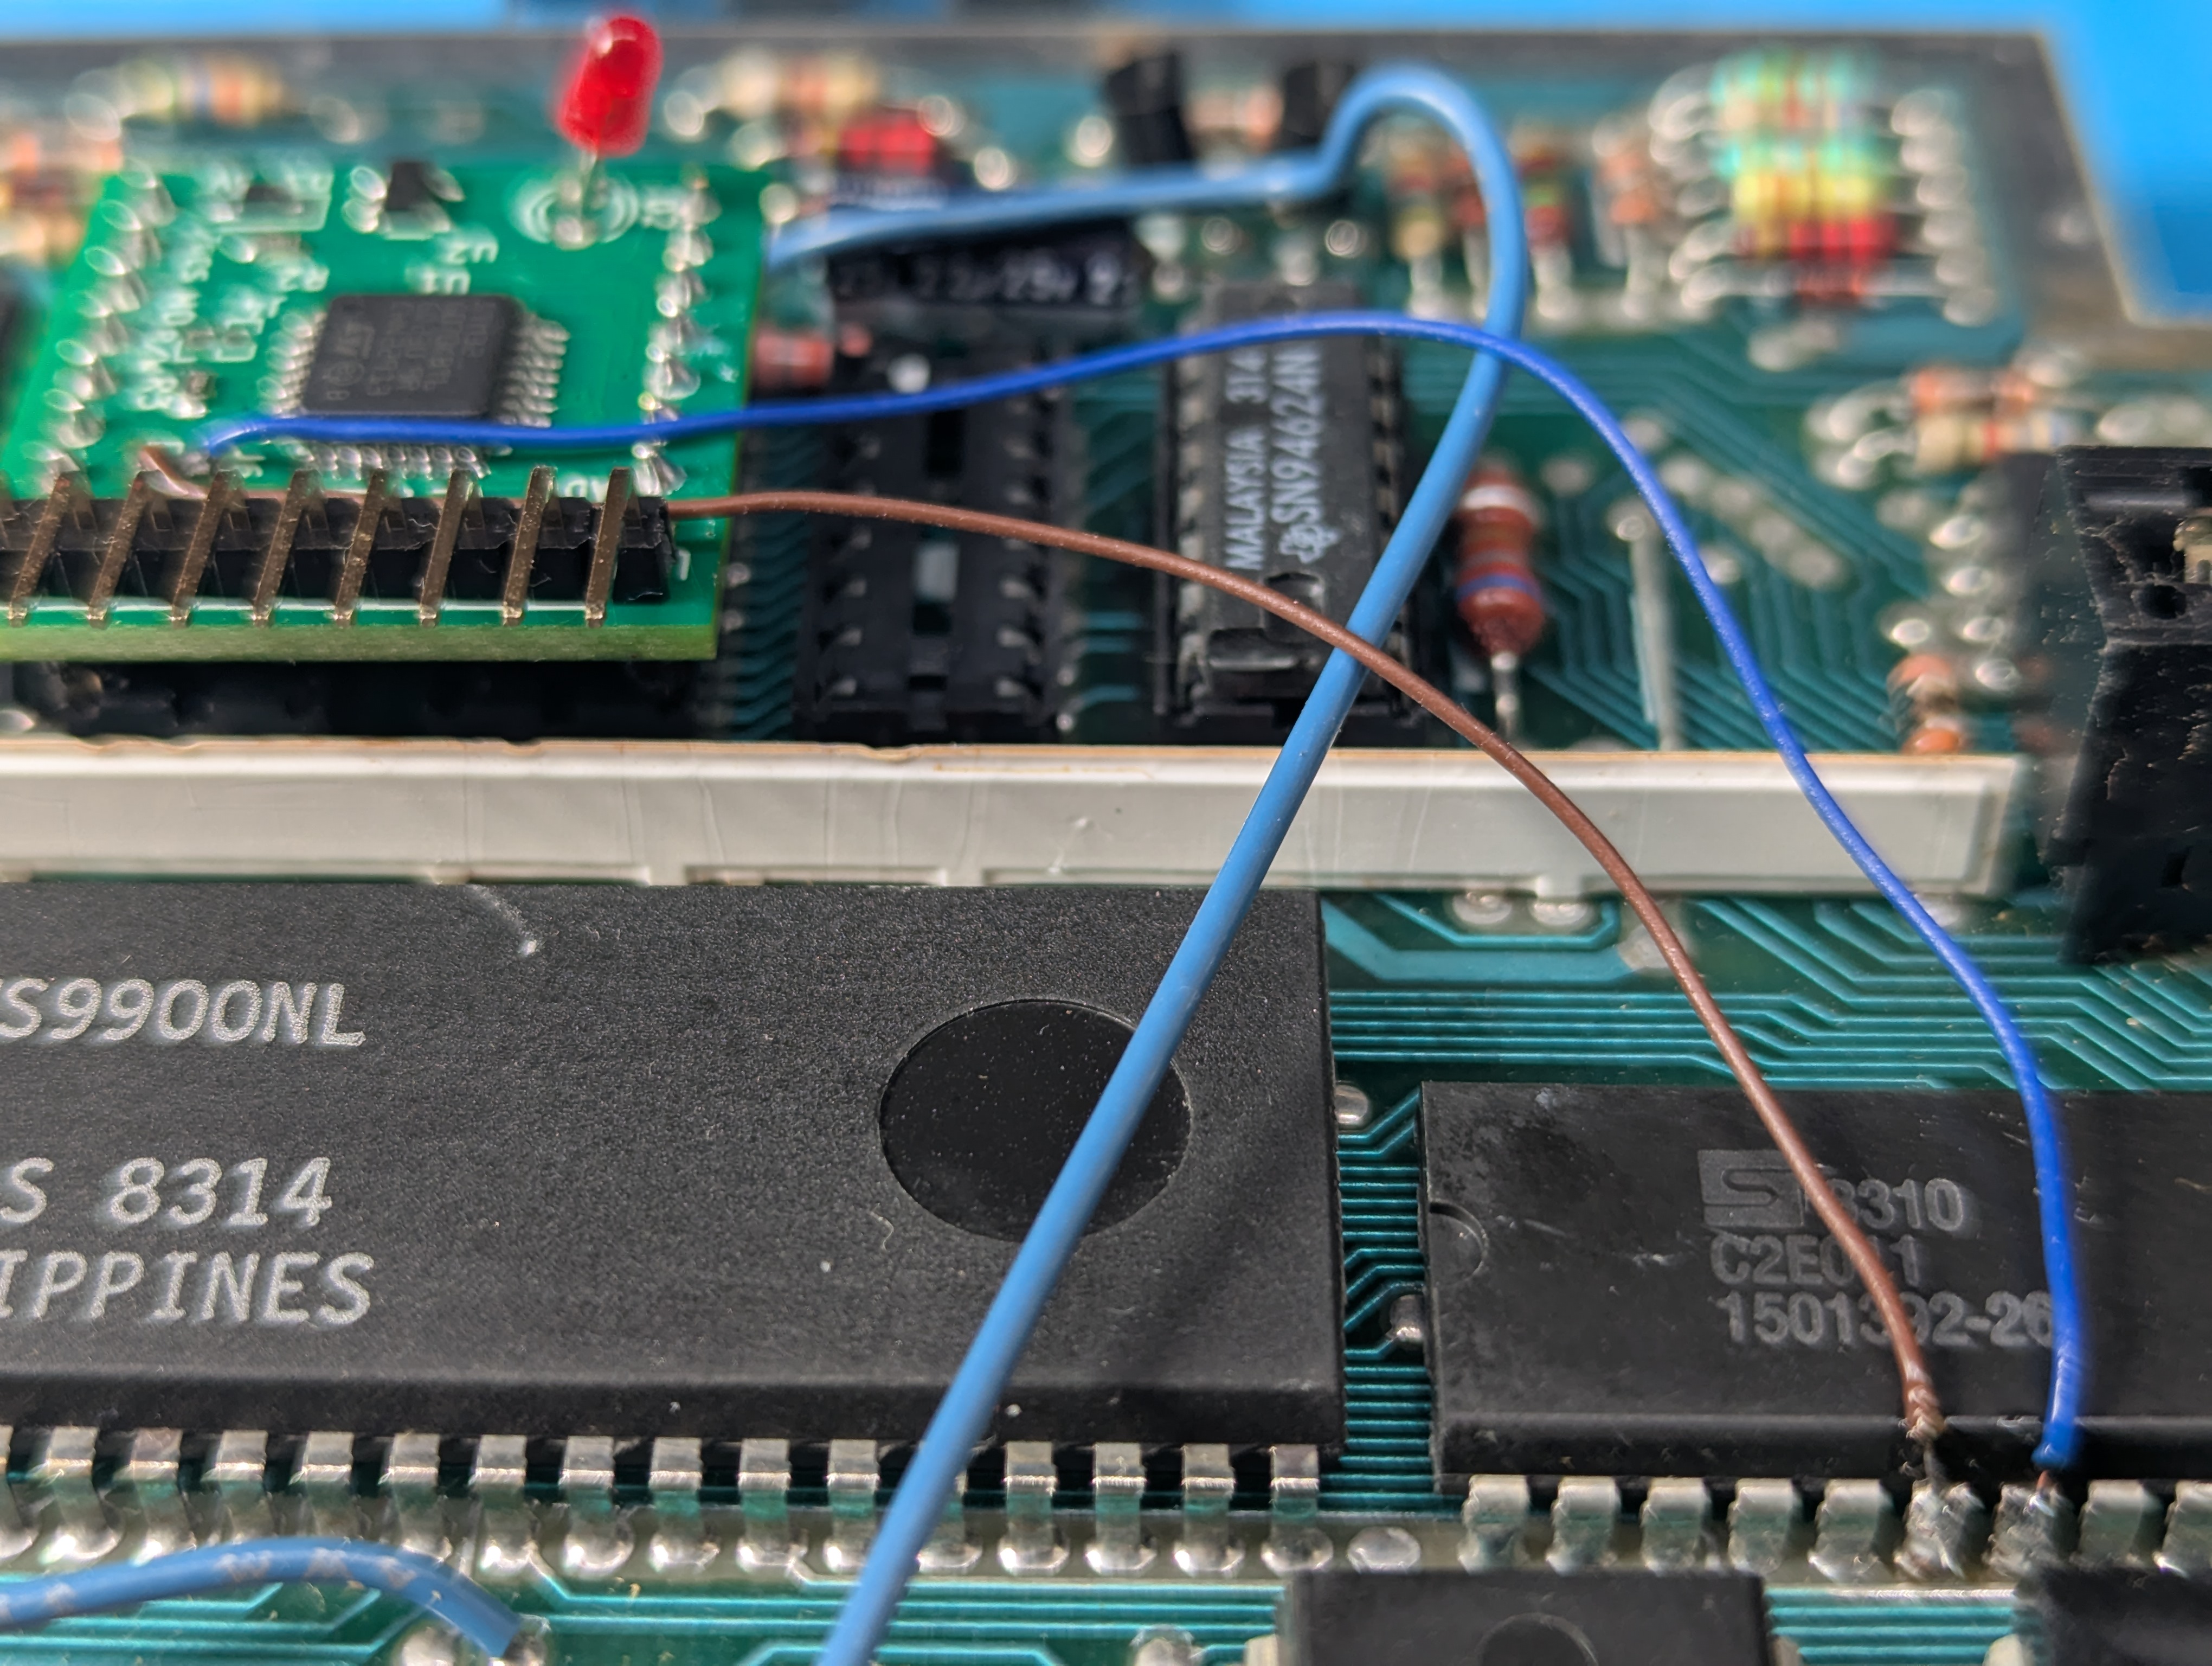
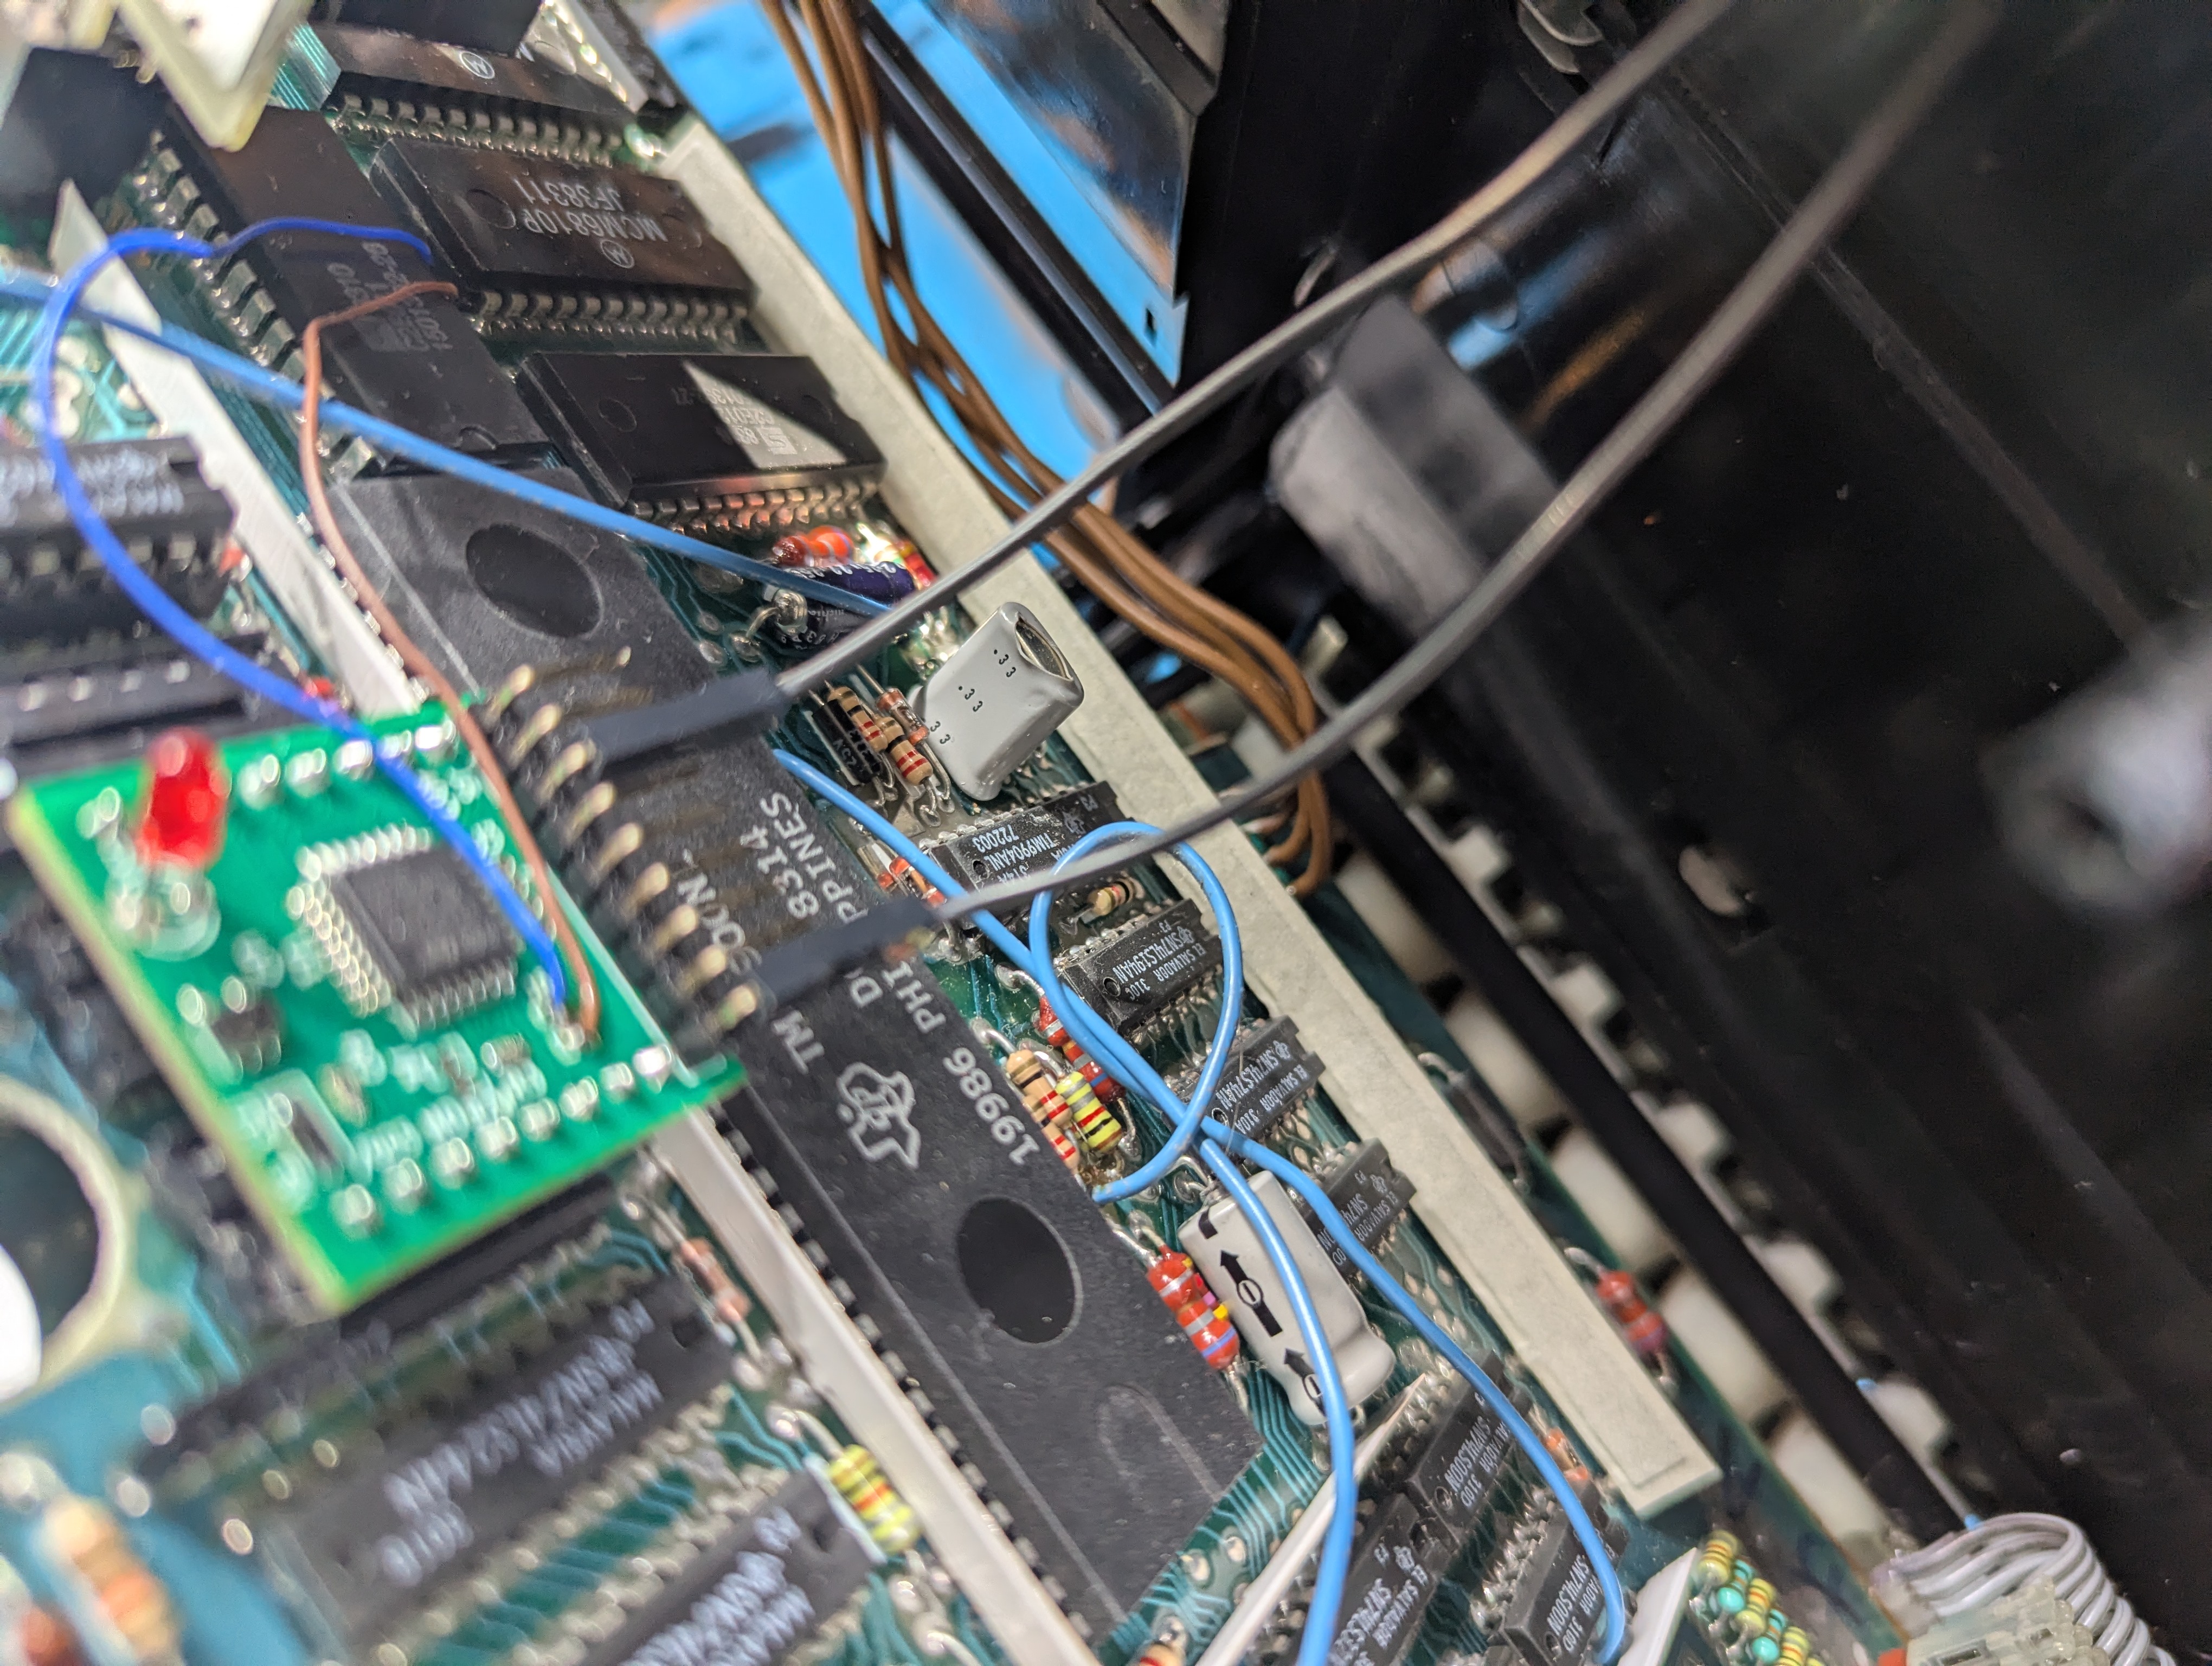
- CHECK YOUR INSTALLATION Now that you completed the above four steps, its time to step back and review your work, and make sure it looks like the following photo:
- OPTIONAL FAILSAFE SWITCH The last step is optional, and only if you want a “failsafe” mode to access the built-in recovery 6K GROM, which is accessed on power-up with PA2 tied to GROUND, as detailed in the full Grommy2 PDF manual found in our downloads section.
- CONSOLE REASSEMBLY The final step, is to re-assemble your console, by following the earlier disassembly guide, but leaving out the “top shield” part, as its a tight fit and we do not want any damage from possible contact with the metal cover, and finally check again to make sure the Grommy2 is inserted fully after placing the motherboard back in, before screwing on the final bottom plastic cover.


PART 2 – FIRMWARE INSTALLATION
There is two ways to do so, loading and running the “diskette” 90k floppy image contained in our released zip file from the downloads page, or via the “binary cartridge” image using a cartridge device like Flashrom99 or FinalGrom99 to run the upgrader. This only has to be done once program the Grommy2 device fully with our TePhOS 9t9 firmware, or for all future upgrades.
PLEASE NOTE: – Currently, our installation program makes use of the 32k Expansion Memory, once the progress is completed and all four banks are programmed with our TePhOS release, you no longer require the 32k to run our new “operating system”, but really without having expanded memory on your TI99 system, it is not very enjoyable. 🙂
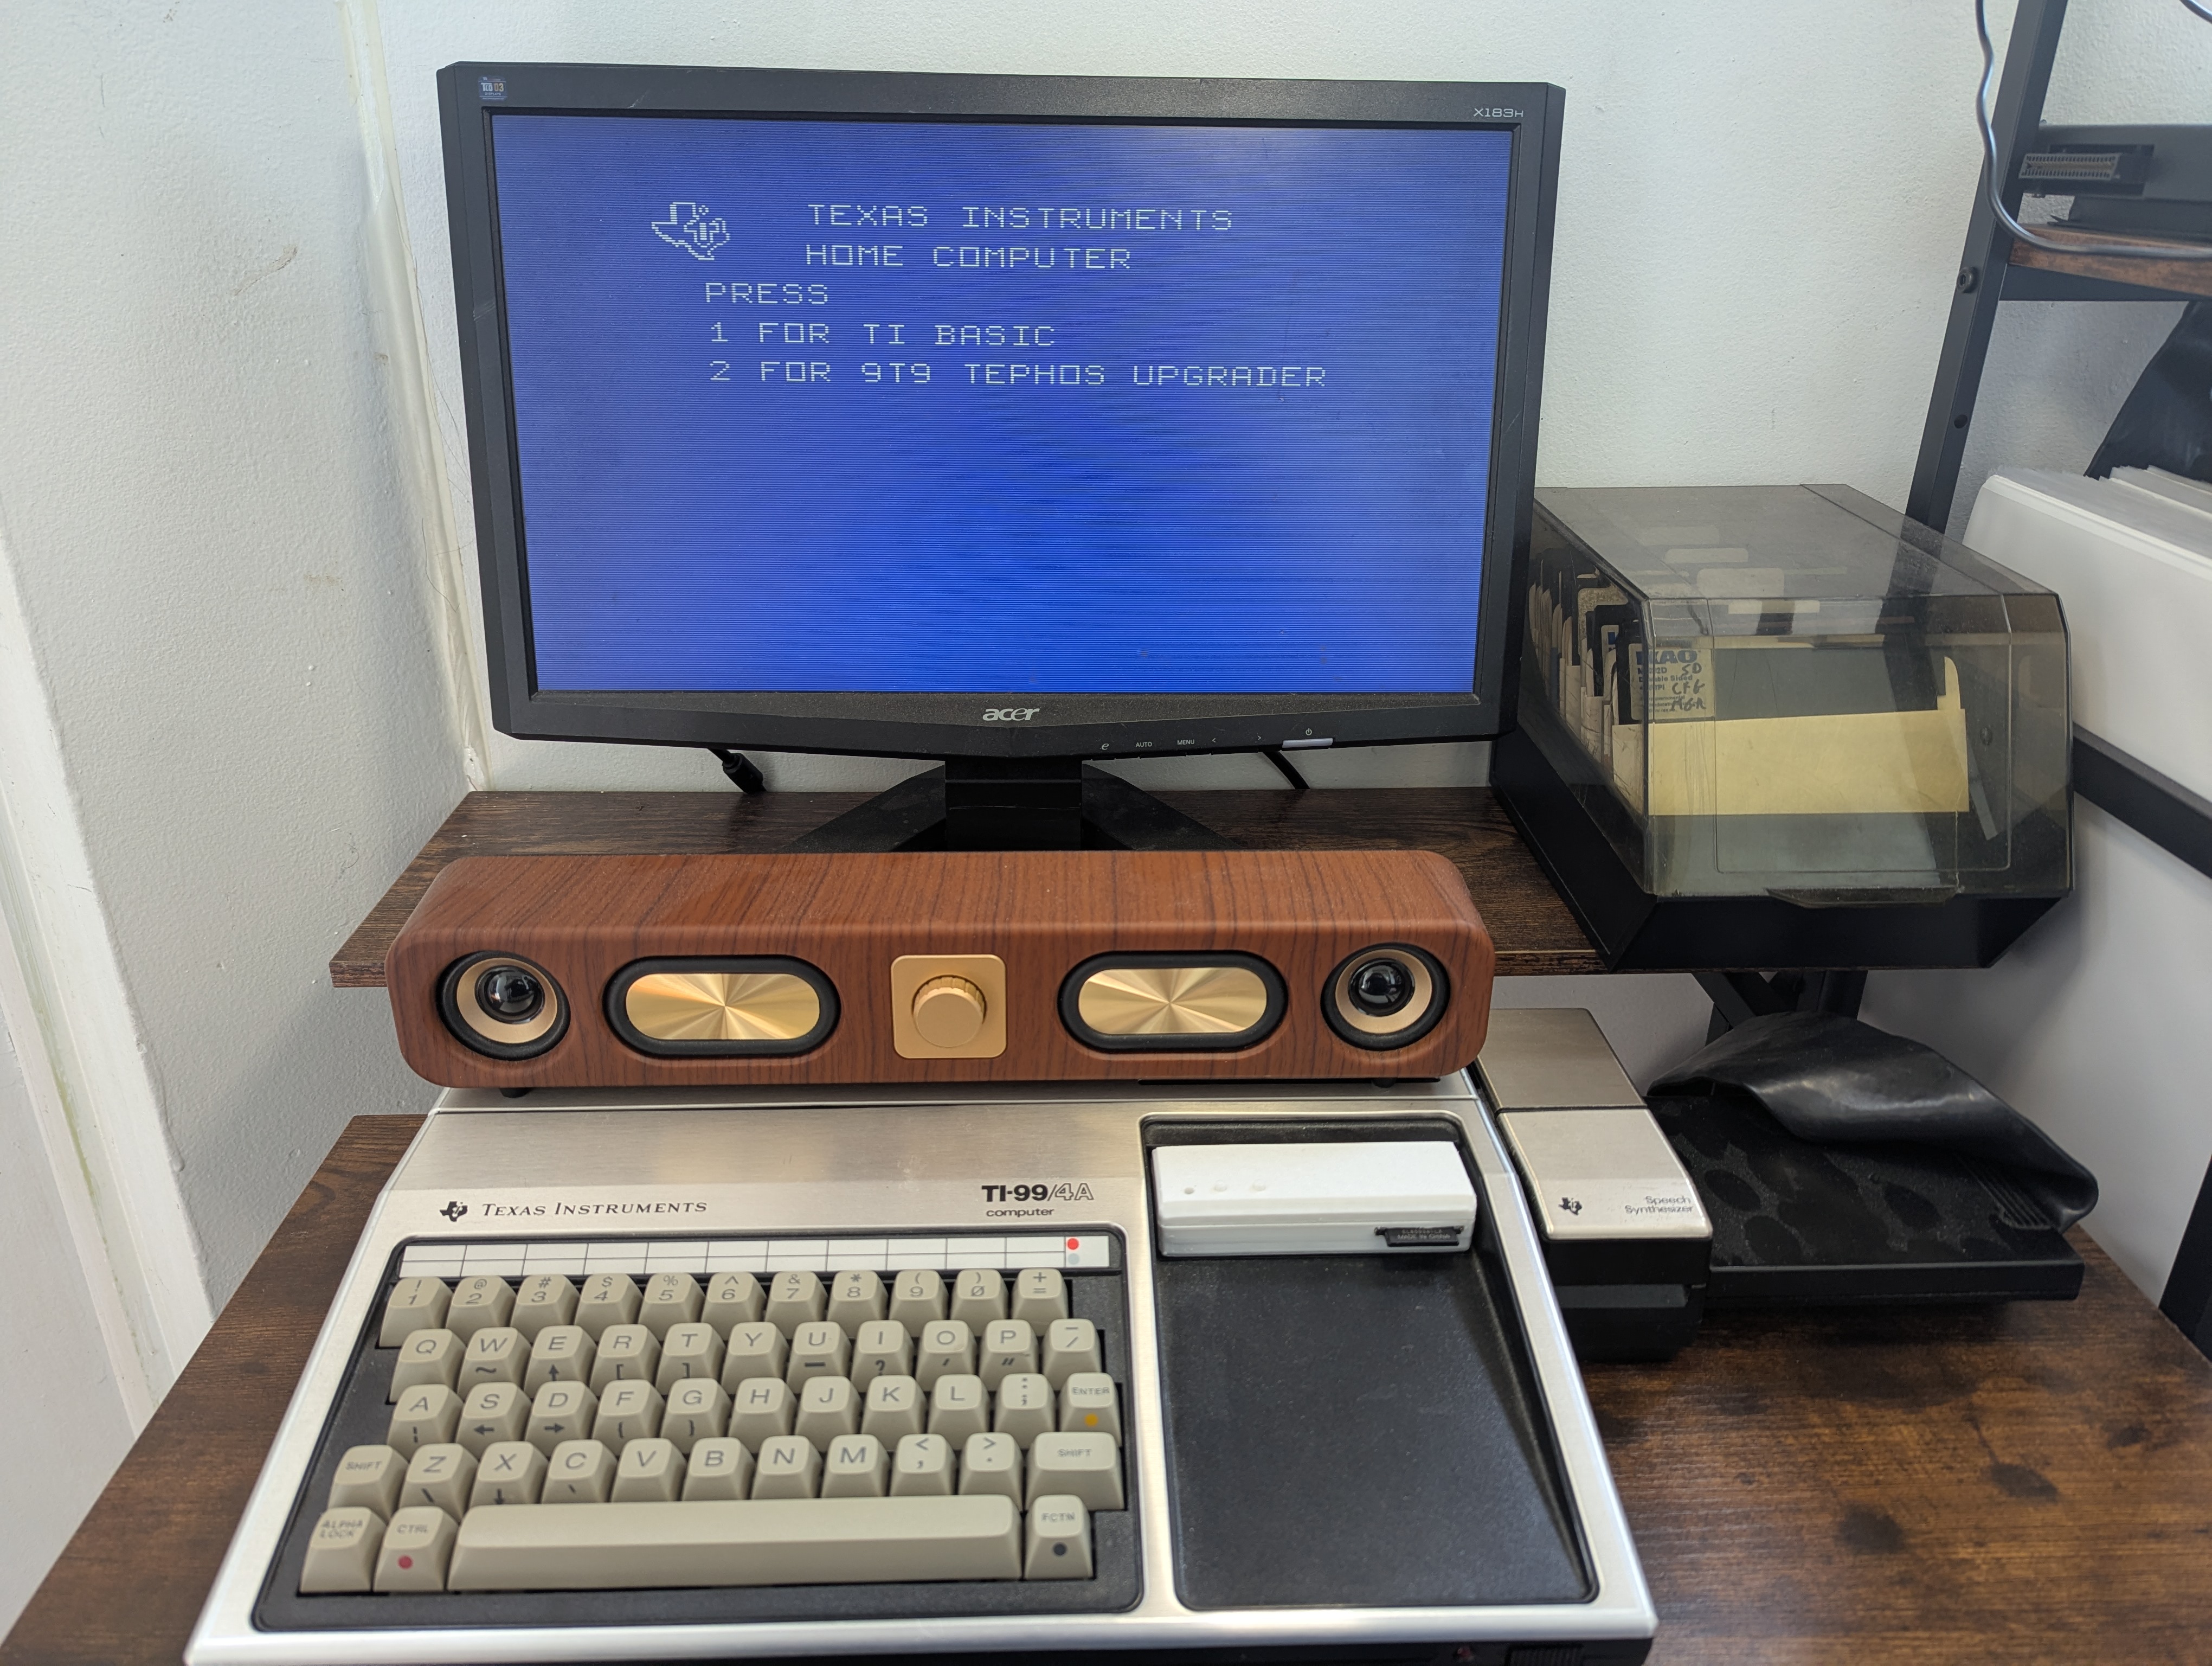
- PICK YOUR INSTALLATION WAY! #1: DISKETTE – Insert the TePhOS Release Floppy into DSK1. and using your TI Extended Basic cartridge, just select it and it will auto-load the program, or using your TI Editor/Assembler cartridge, select option #5 (Program File) and type DSK1.TEPHOS to load the upgrader program.
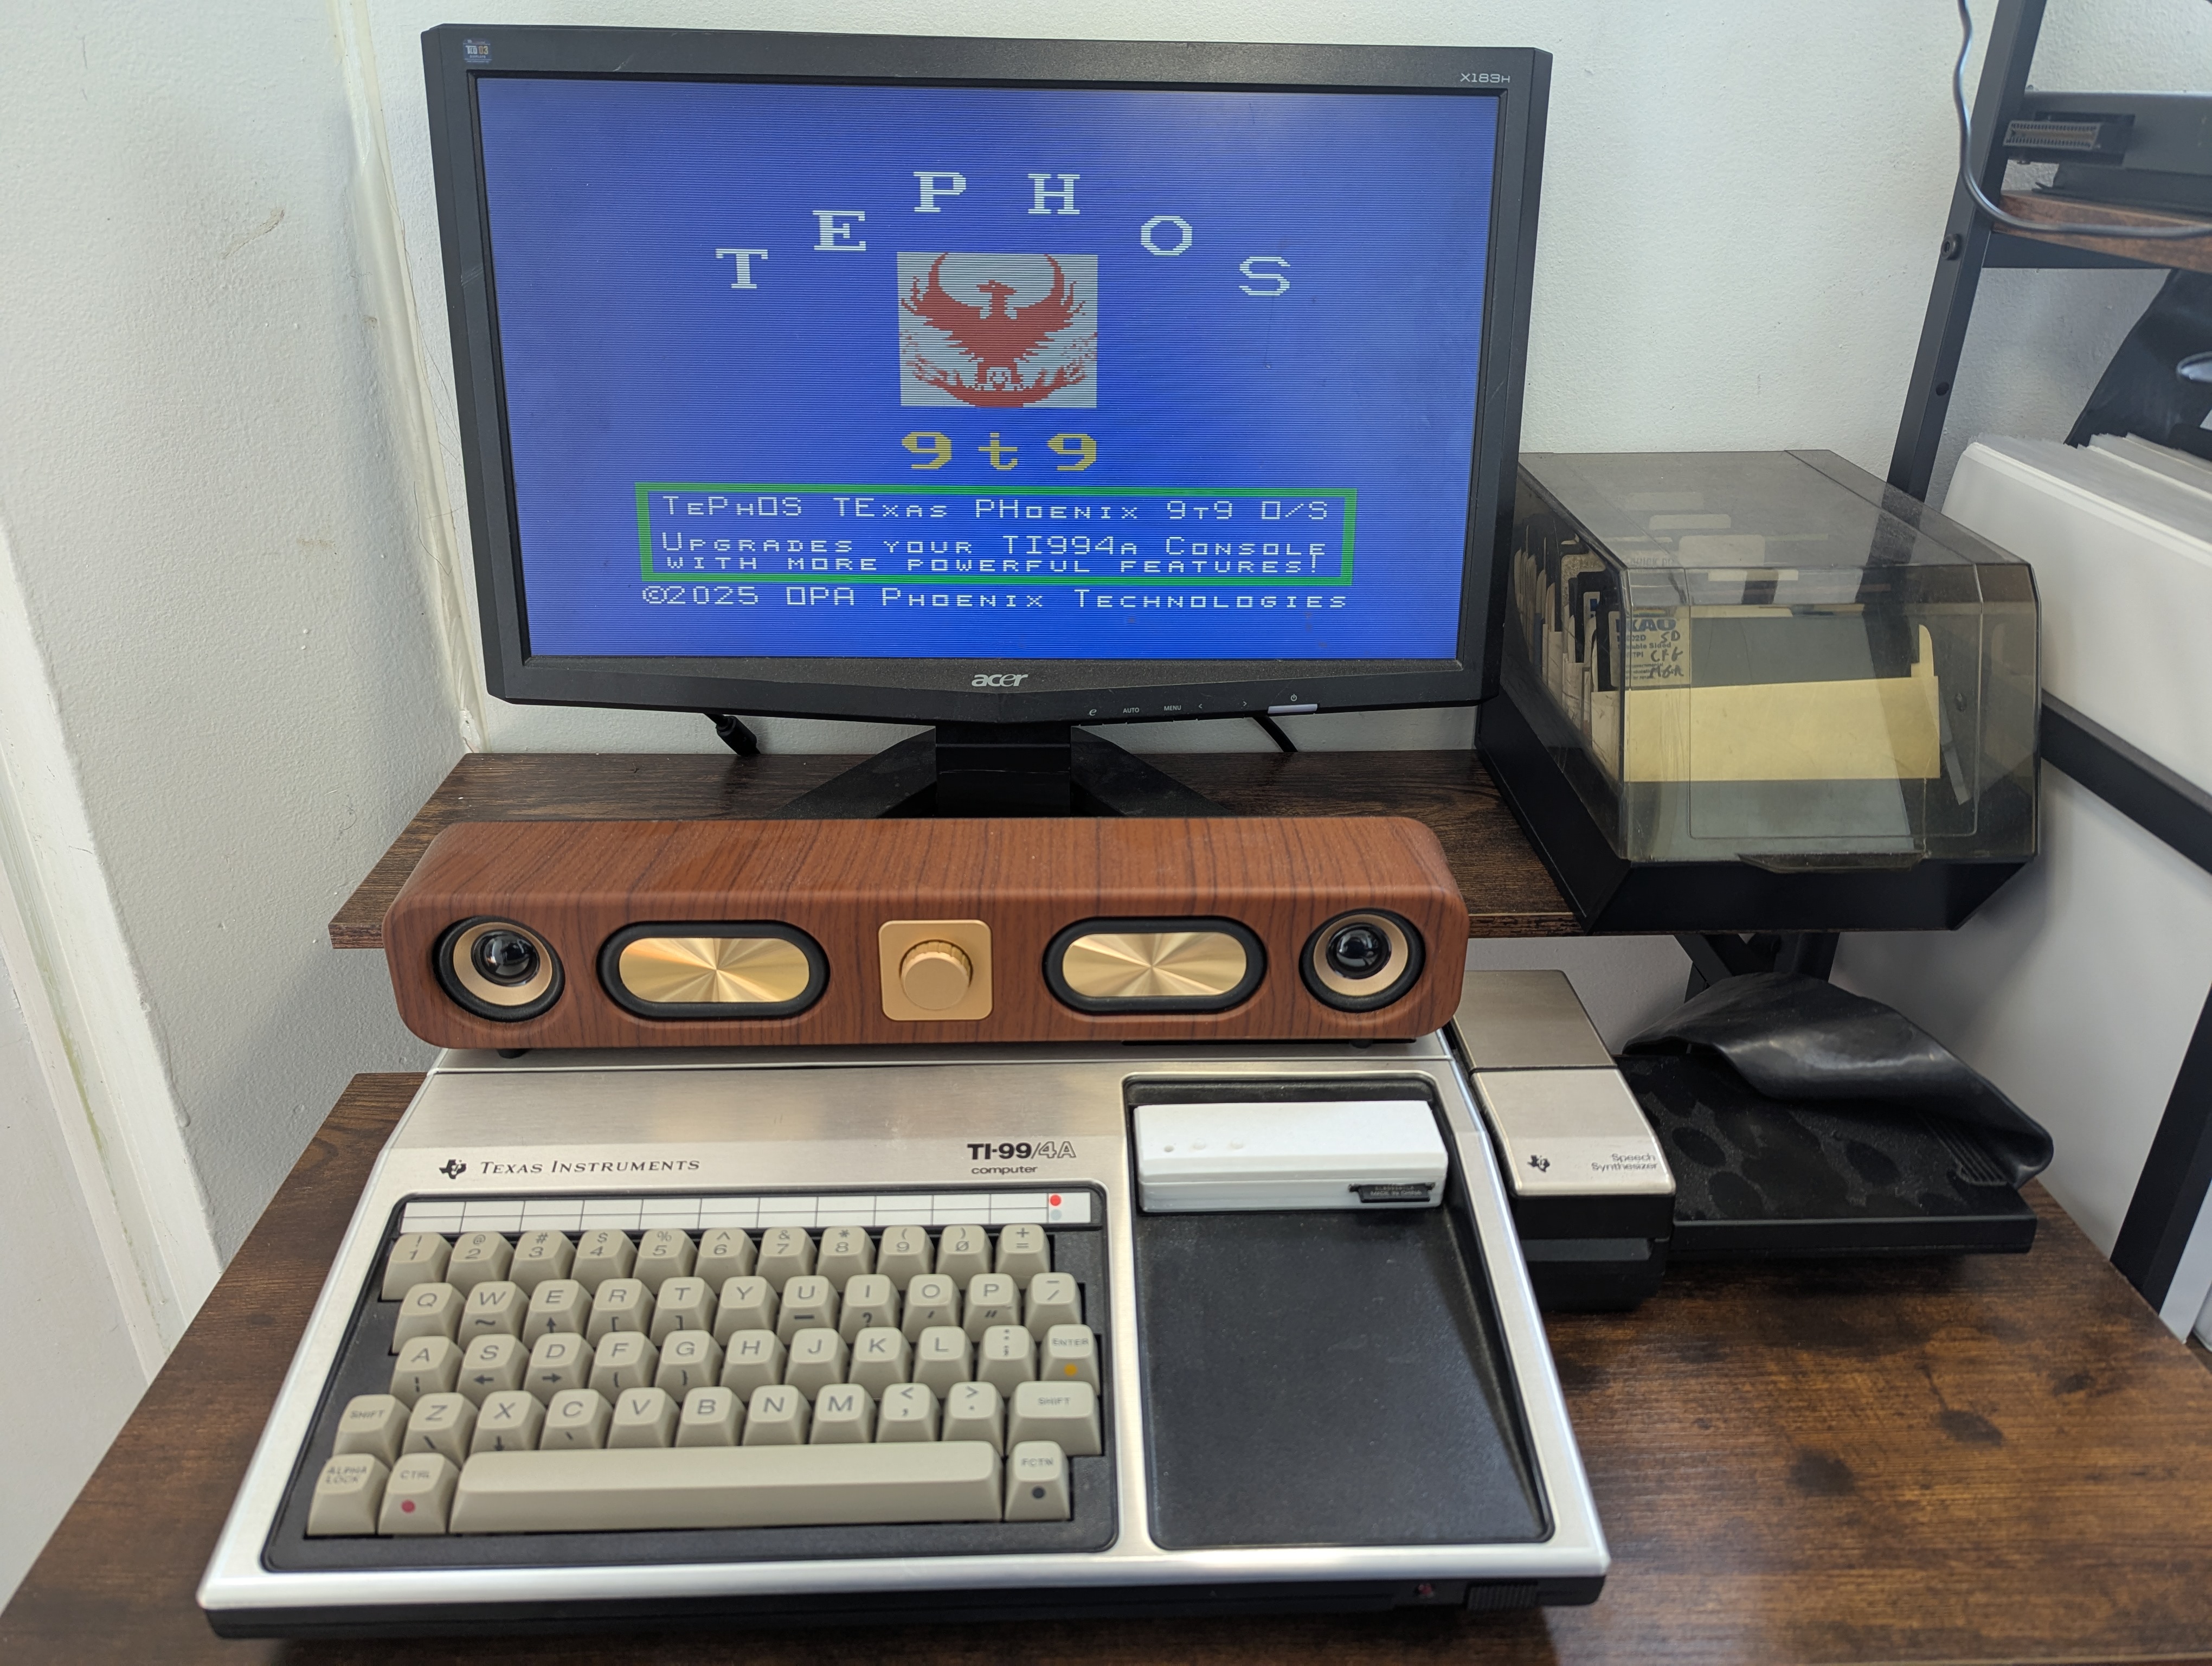
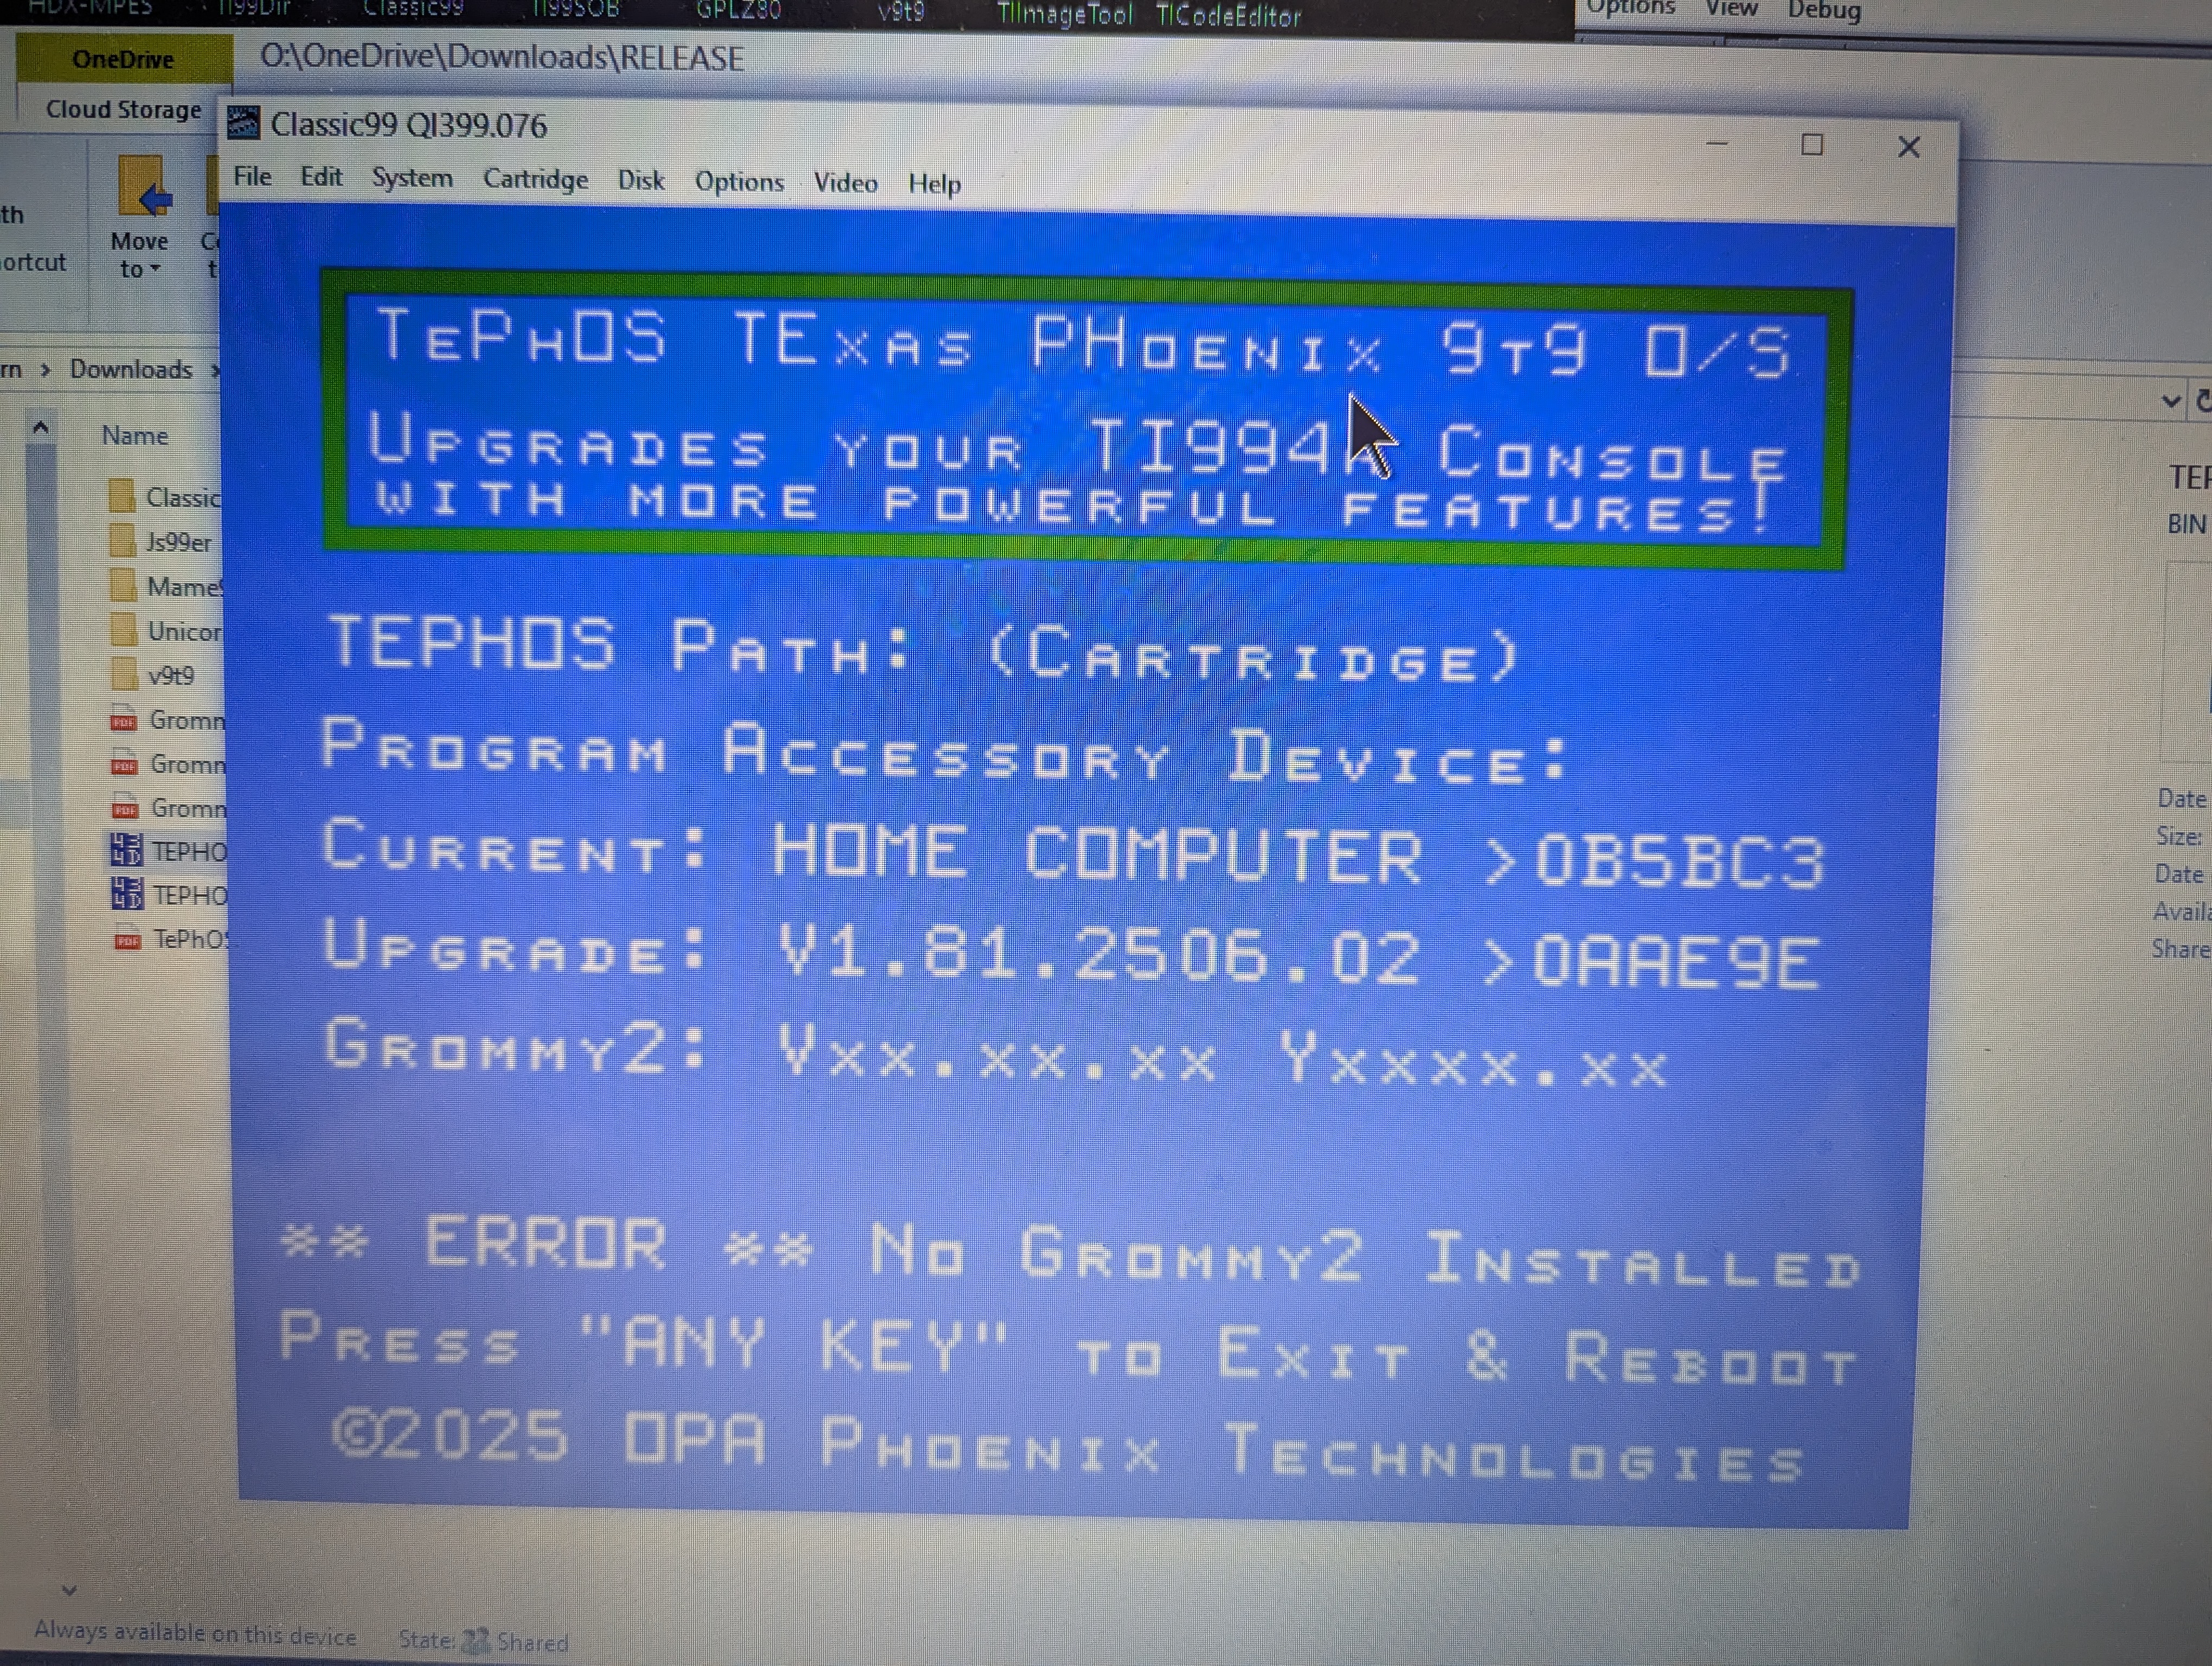
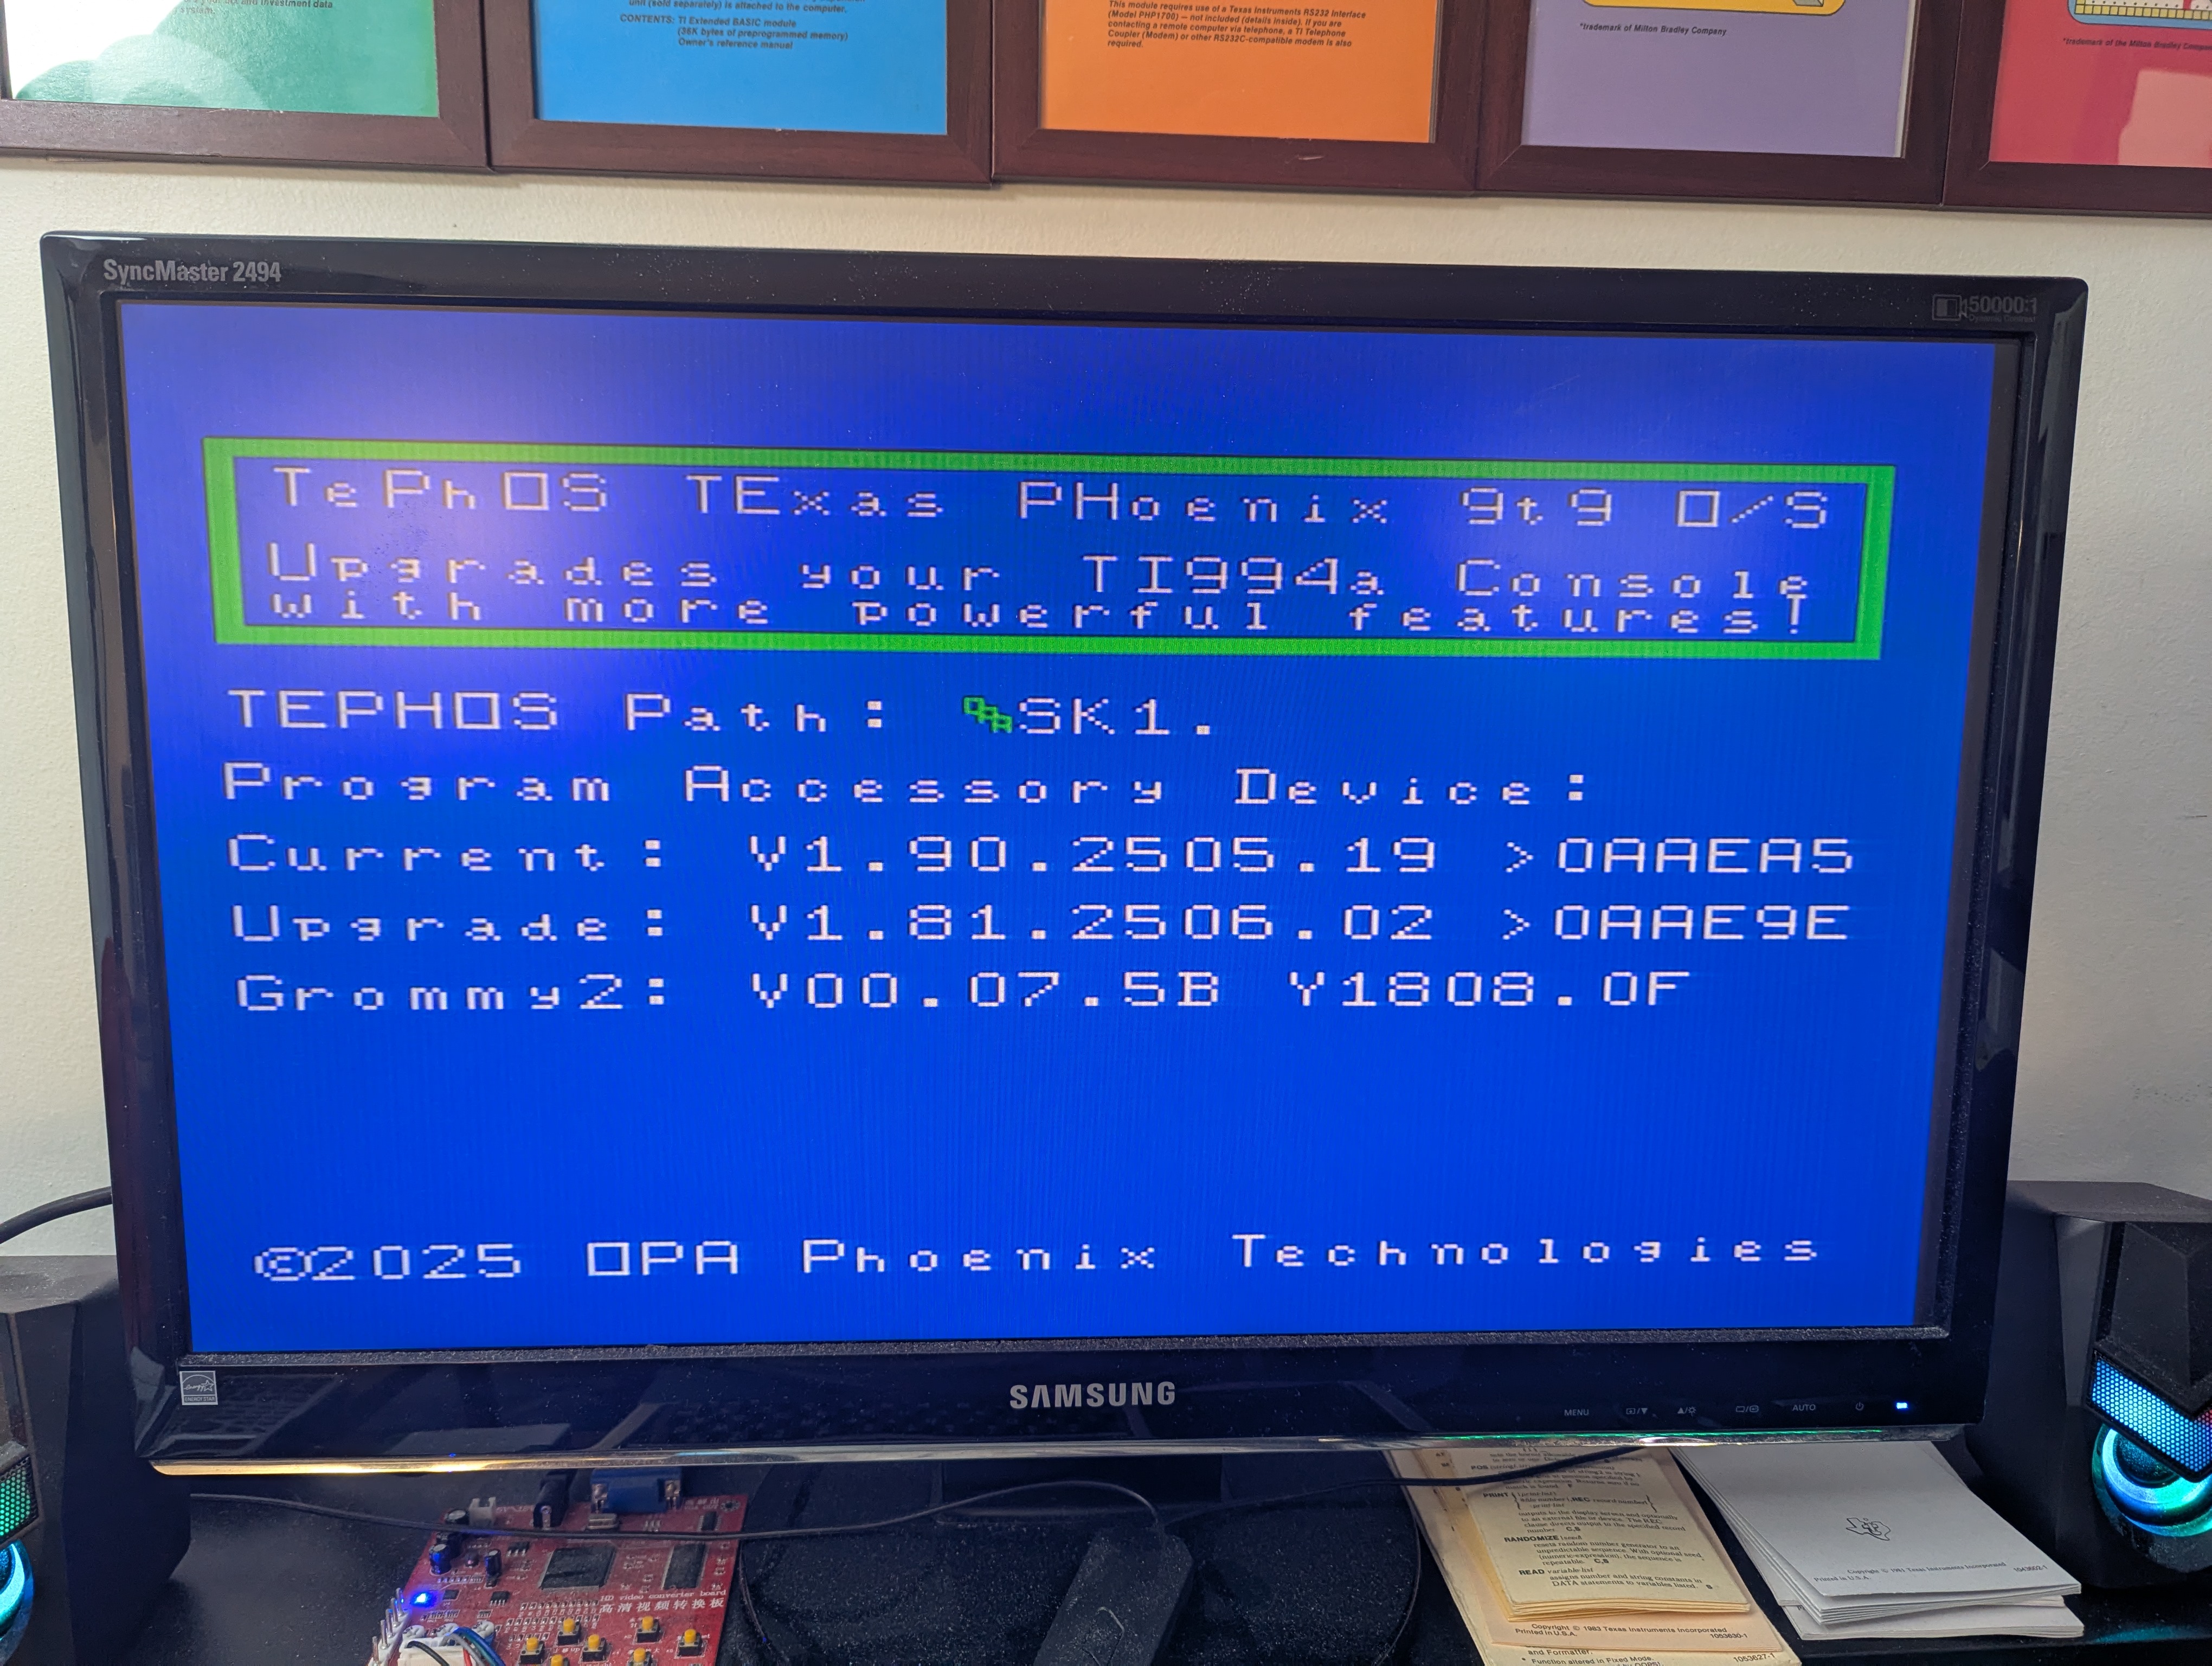
- TEPHOS LOADING PATH After pressing any key to exit the our Phoenix Logo Title Screen, the system will check to see if your Grommy2 device is found, if it has not been installed correctly or not found, you will get an ERROR MESSAGE right away, and the program will exit, if all went well with your earlier hardware installation and it’s correctly detected, you will either see a screen showing (Cartridge) if you picked that way for the firmware installation, or a screen asking for the TePhOS Path: this would be where you currently have the floppy diskette image mounted, it could be any valid system device like; DSK1. / TIPI. / WDS1. / IDE1. / SCS1. / HDX1. (no filename, just the starting device path is required and it must end in a ‘.’)
- PROGRAM ACCESSORY DEVICE The next question our installation program will ask you, is in regard to the device you want to use for any external support files this is for the included modules found inside the TePhOS 9t9 system, like the 9t9 Editor/Assembler and 9t9 Writer, those files are supplied in either 40-column or 80-colum editions and can be found in the related “diskette” image included in the release zip package you have downloaded.
- TYPE ‘YES’ TO UPGRADE Once you have selected the right Tephos Path and your Accessory Device you will be asked to type the word ‘YES’ to upgrade.
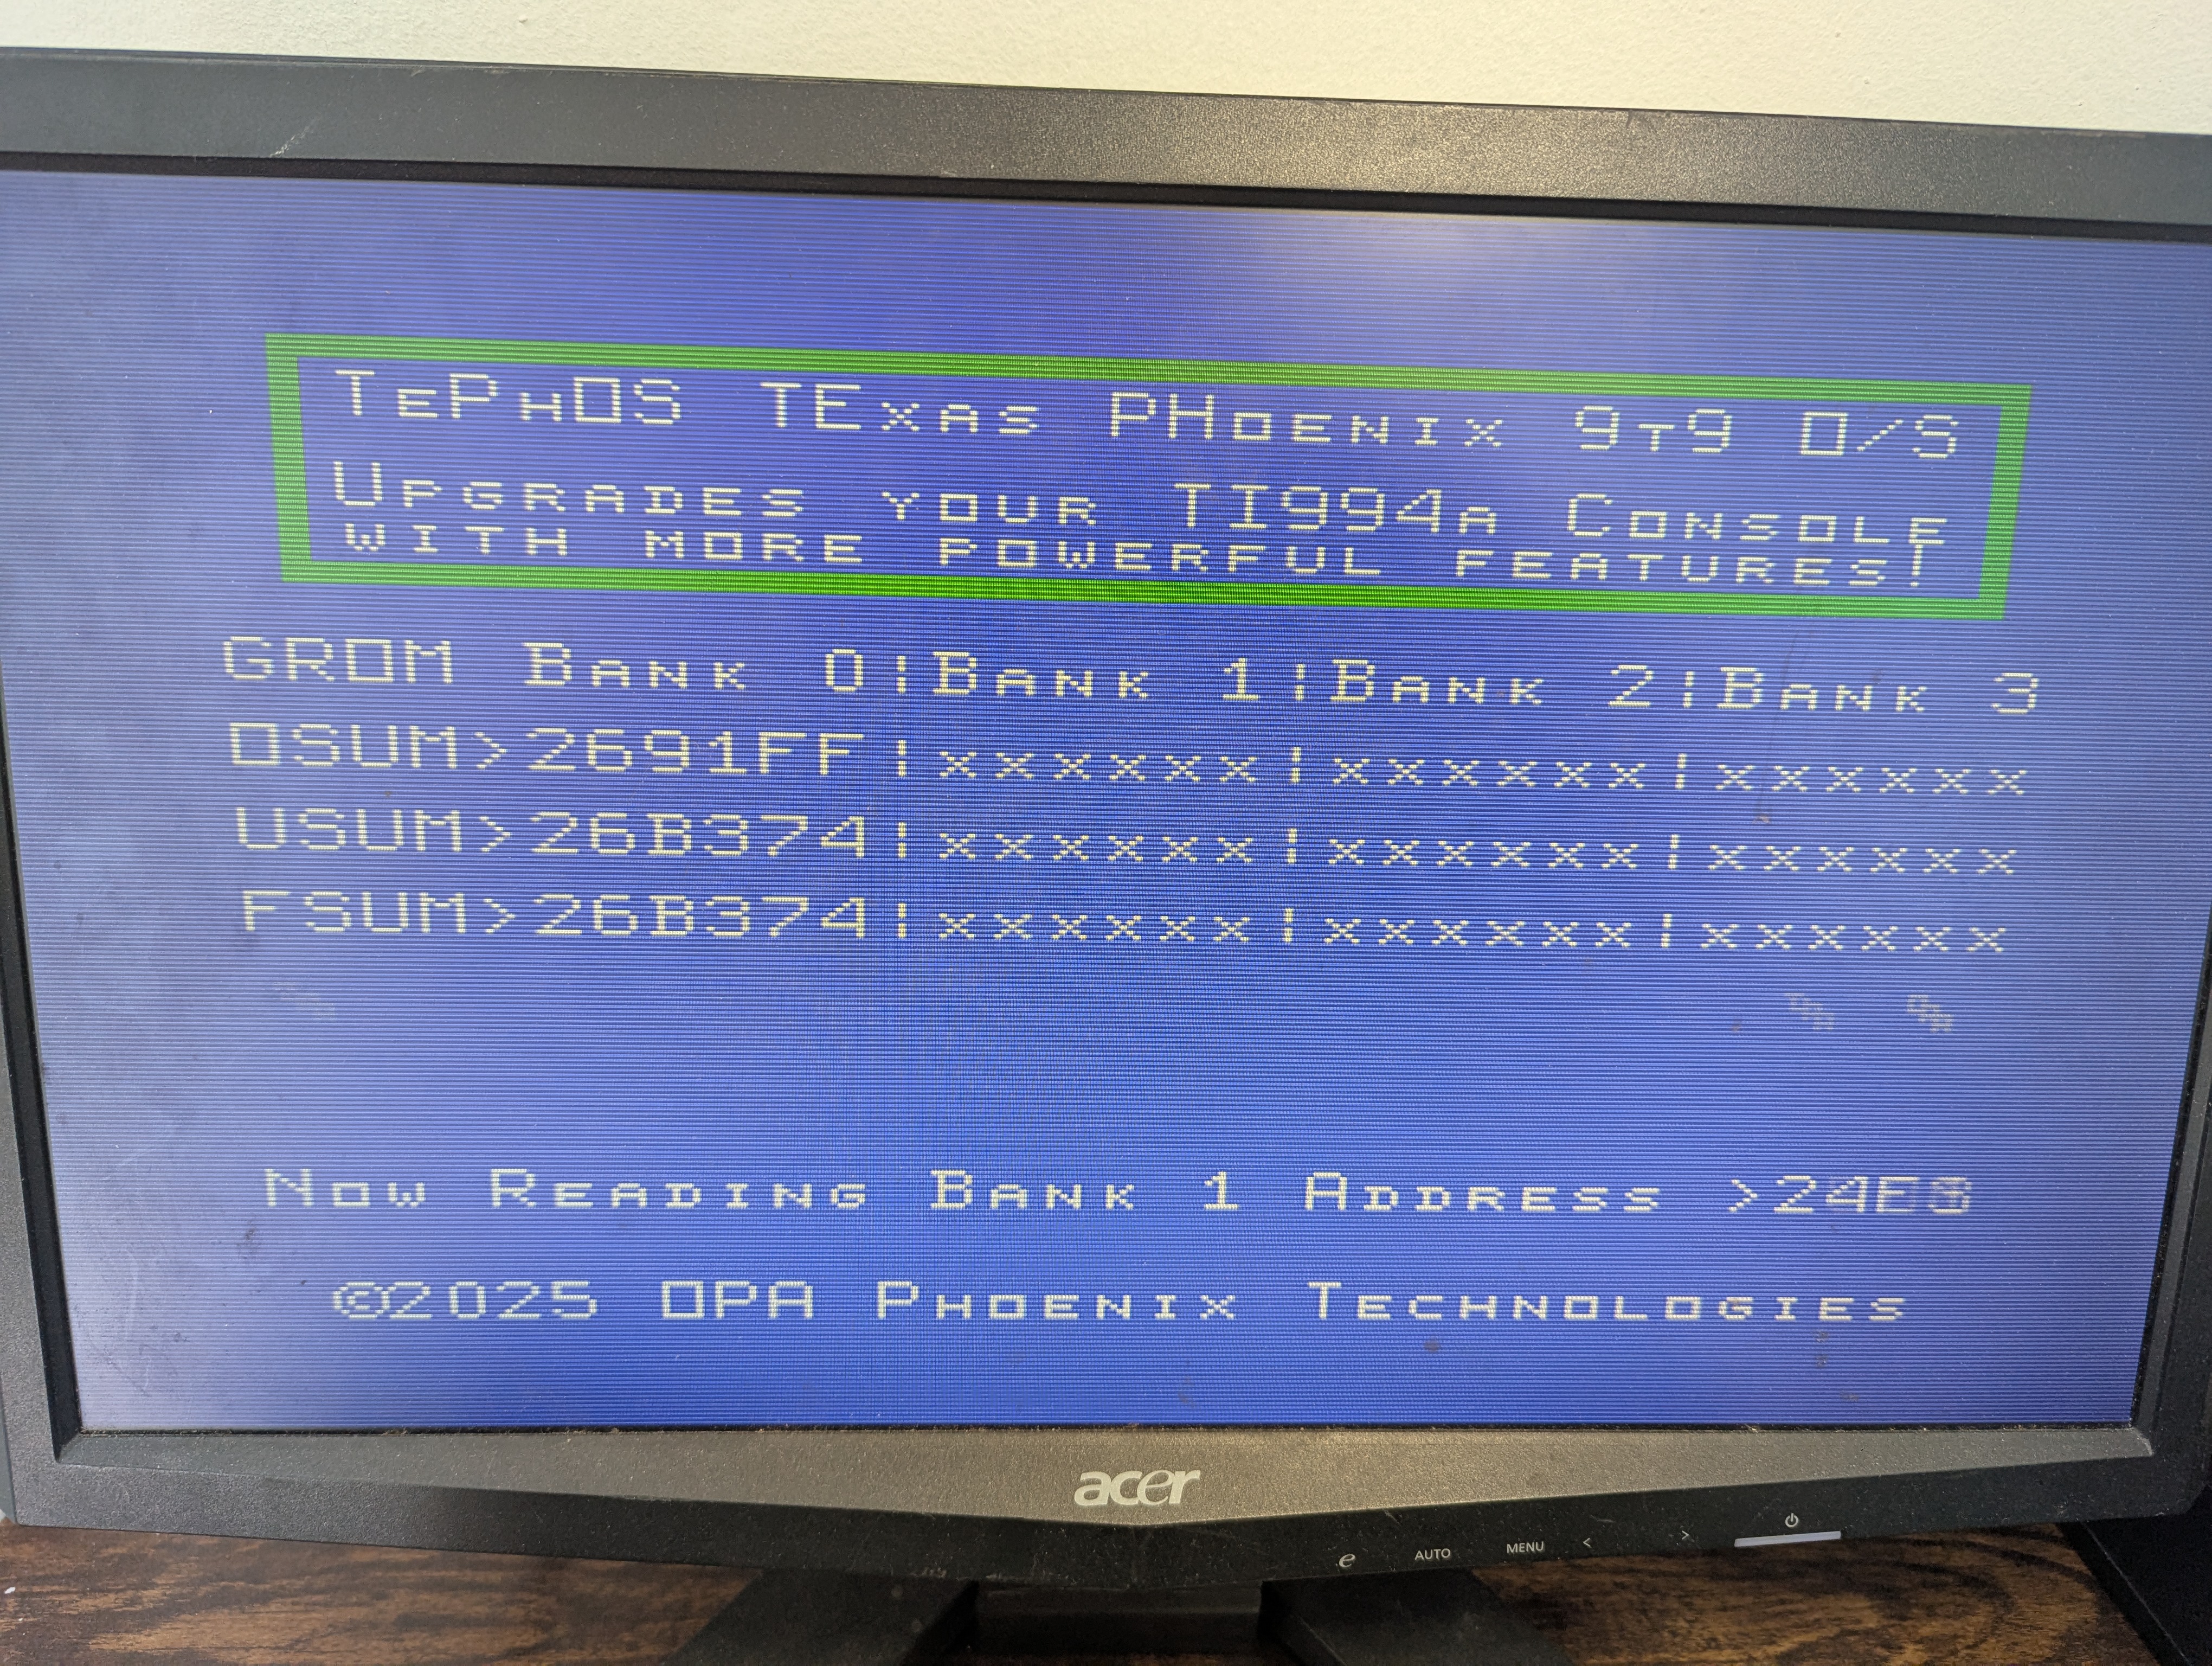
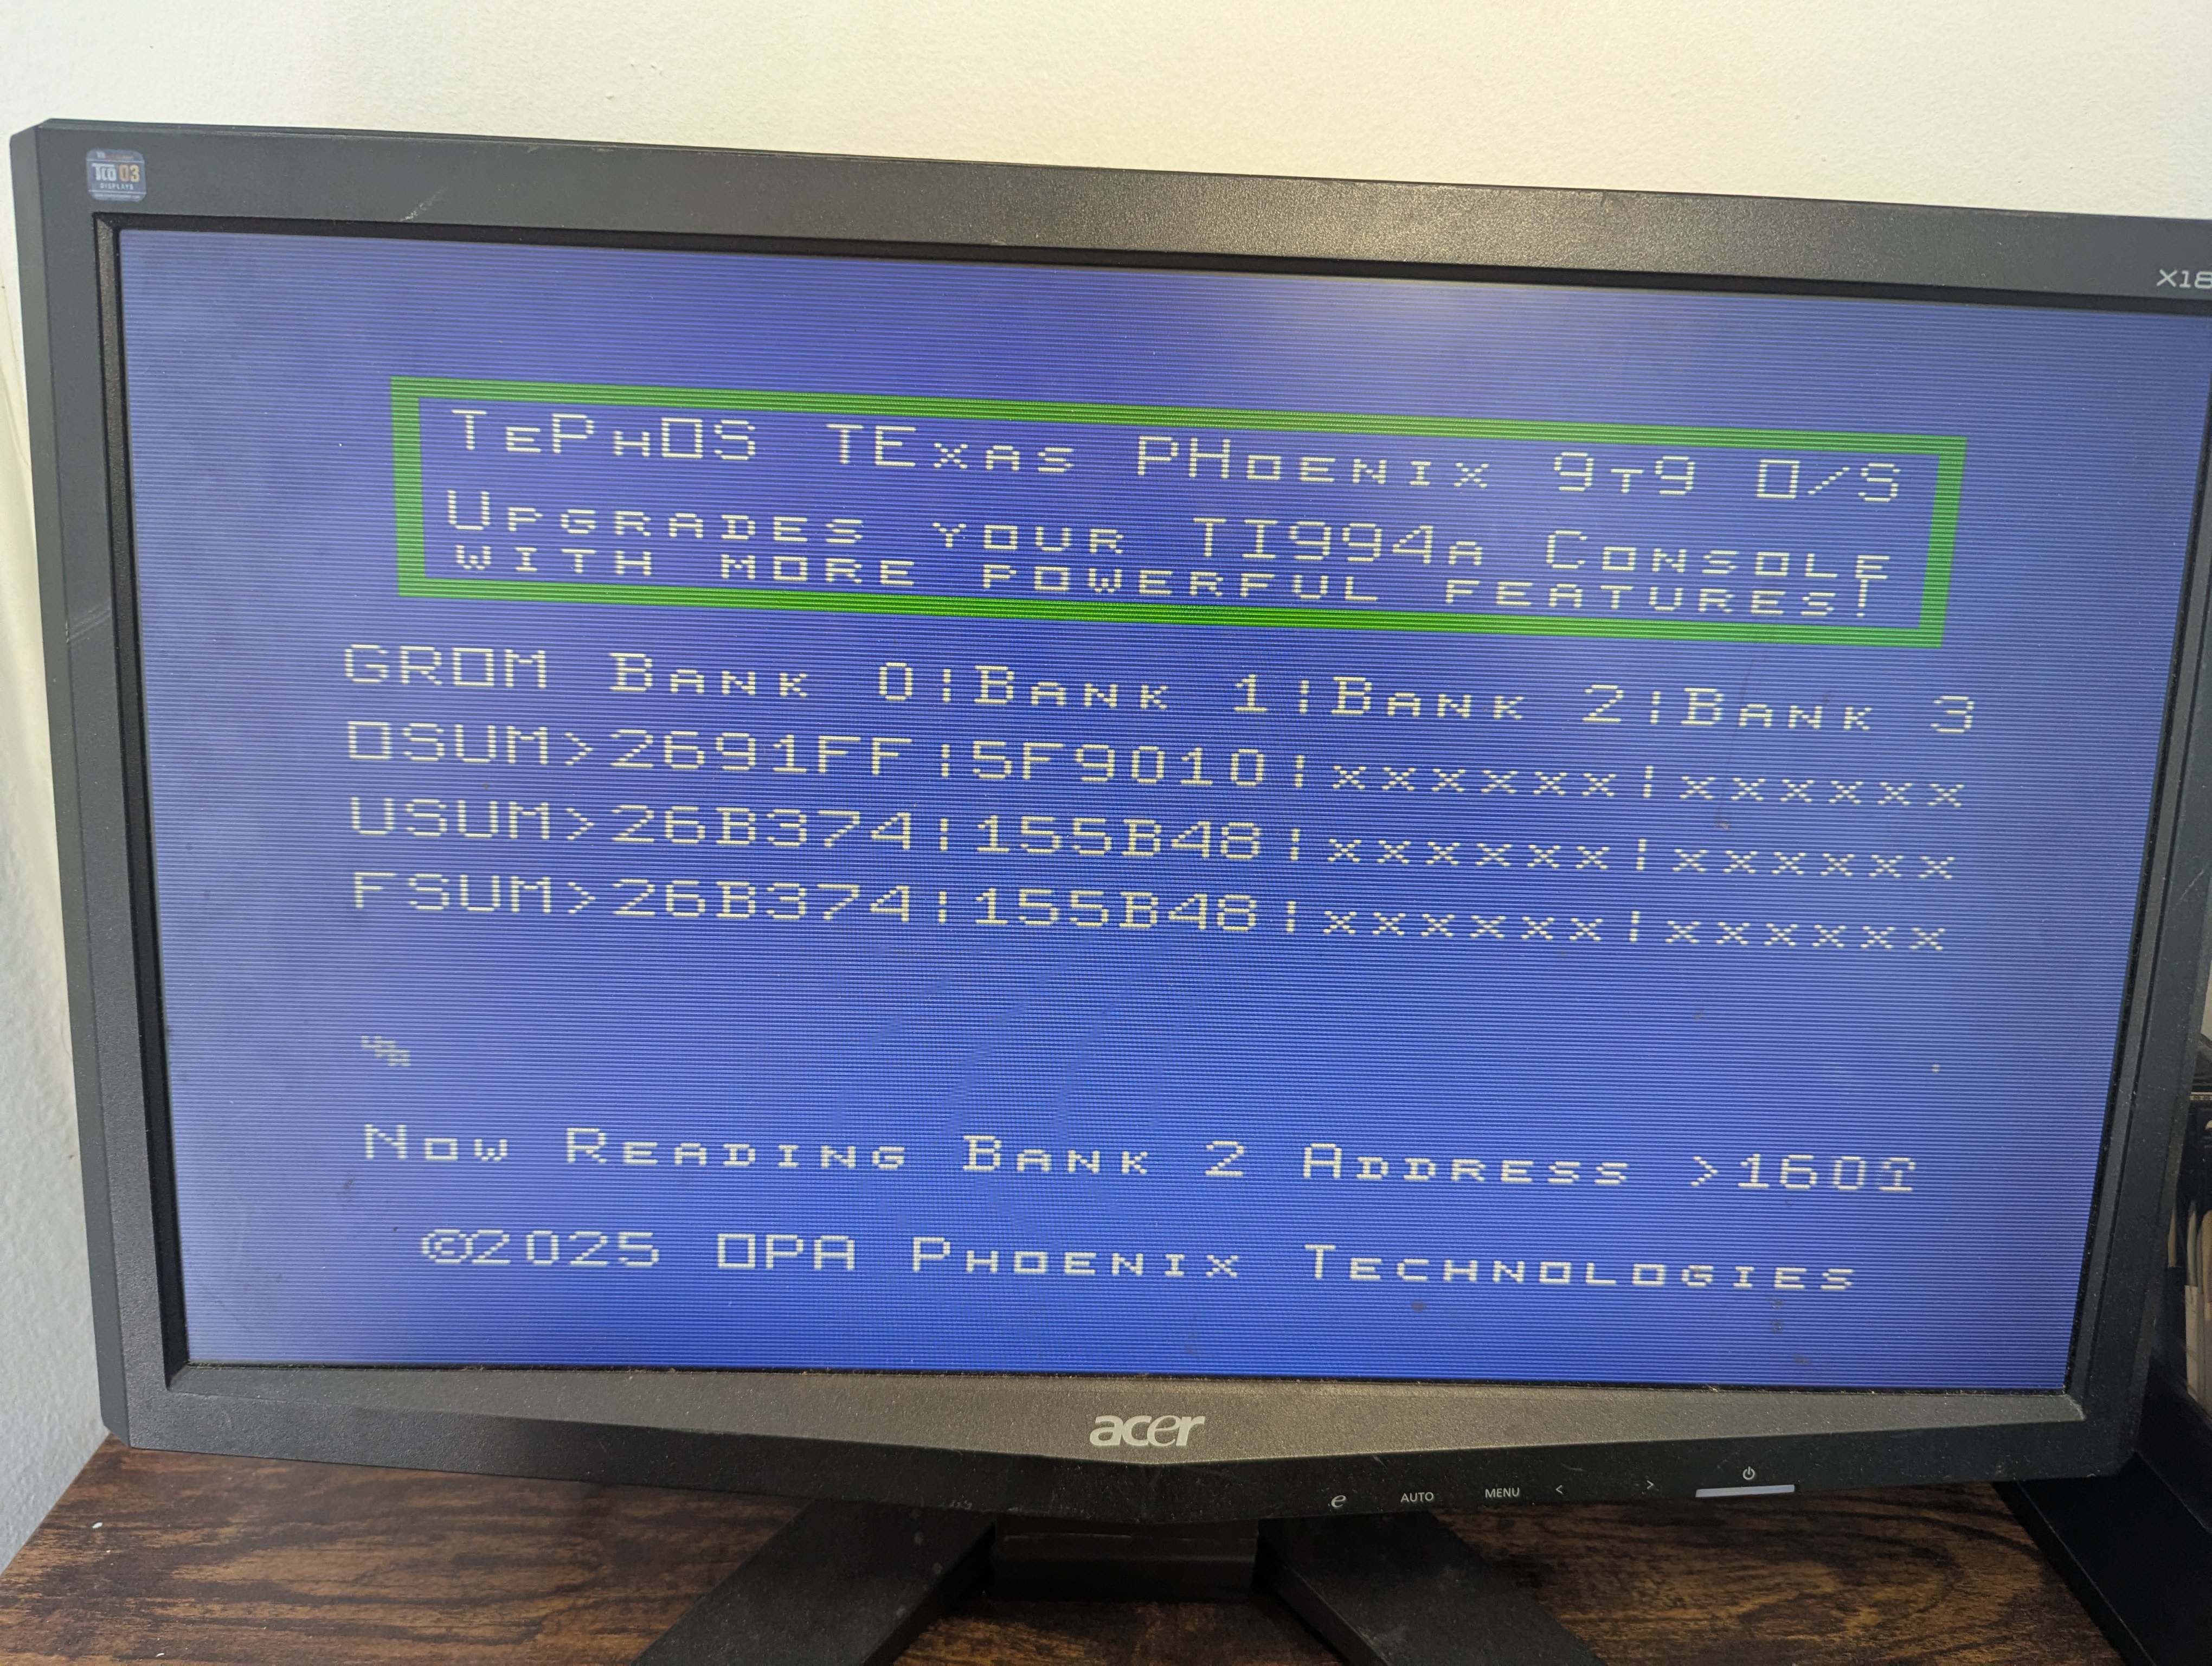
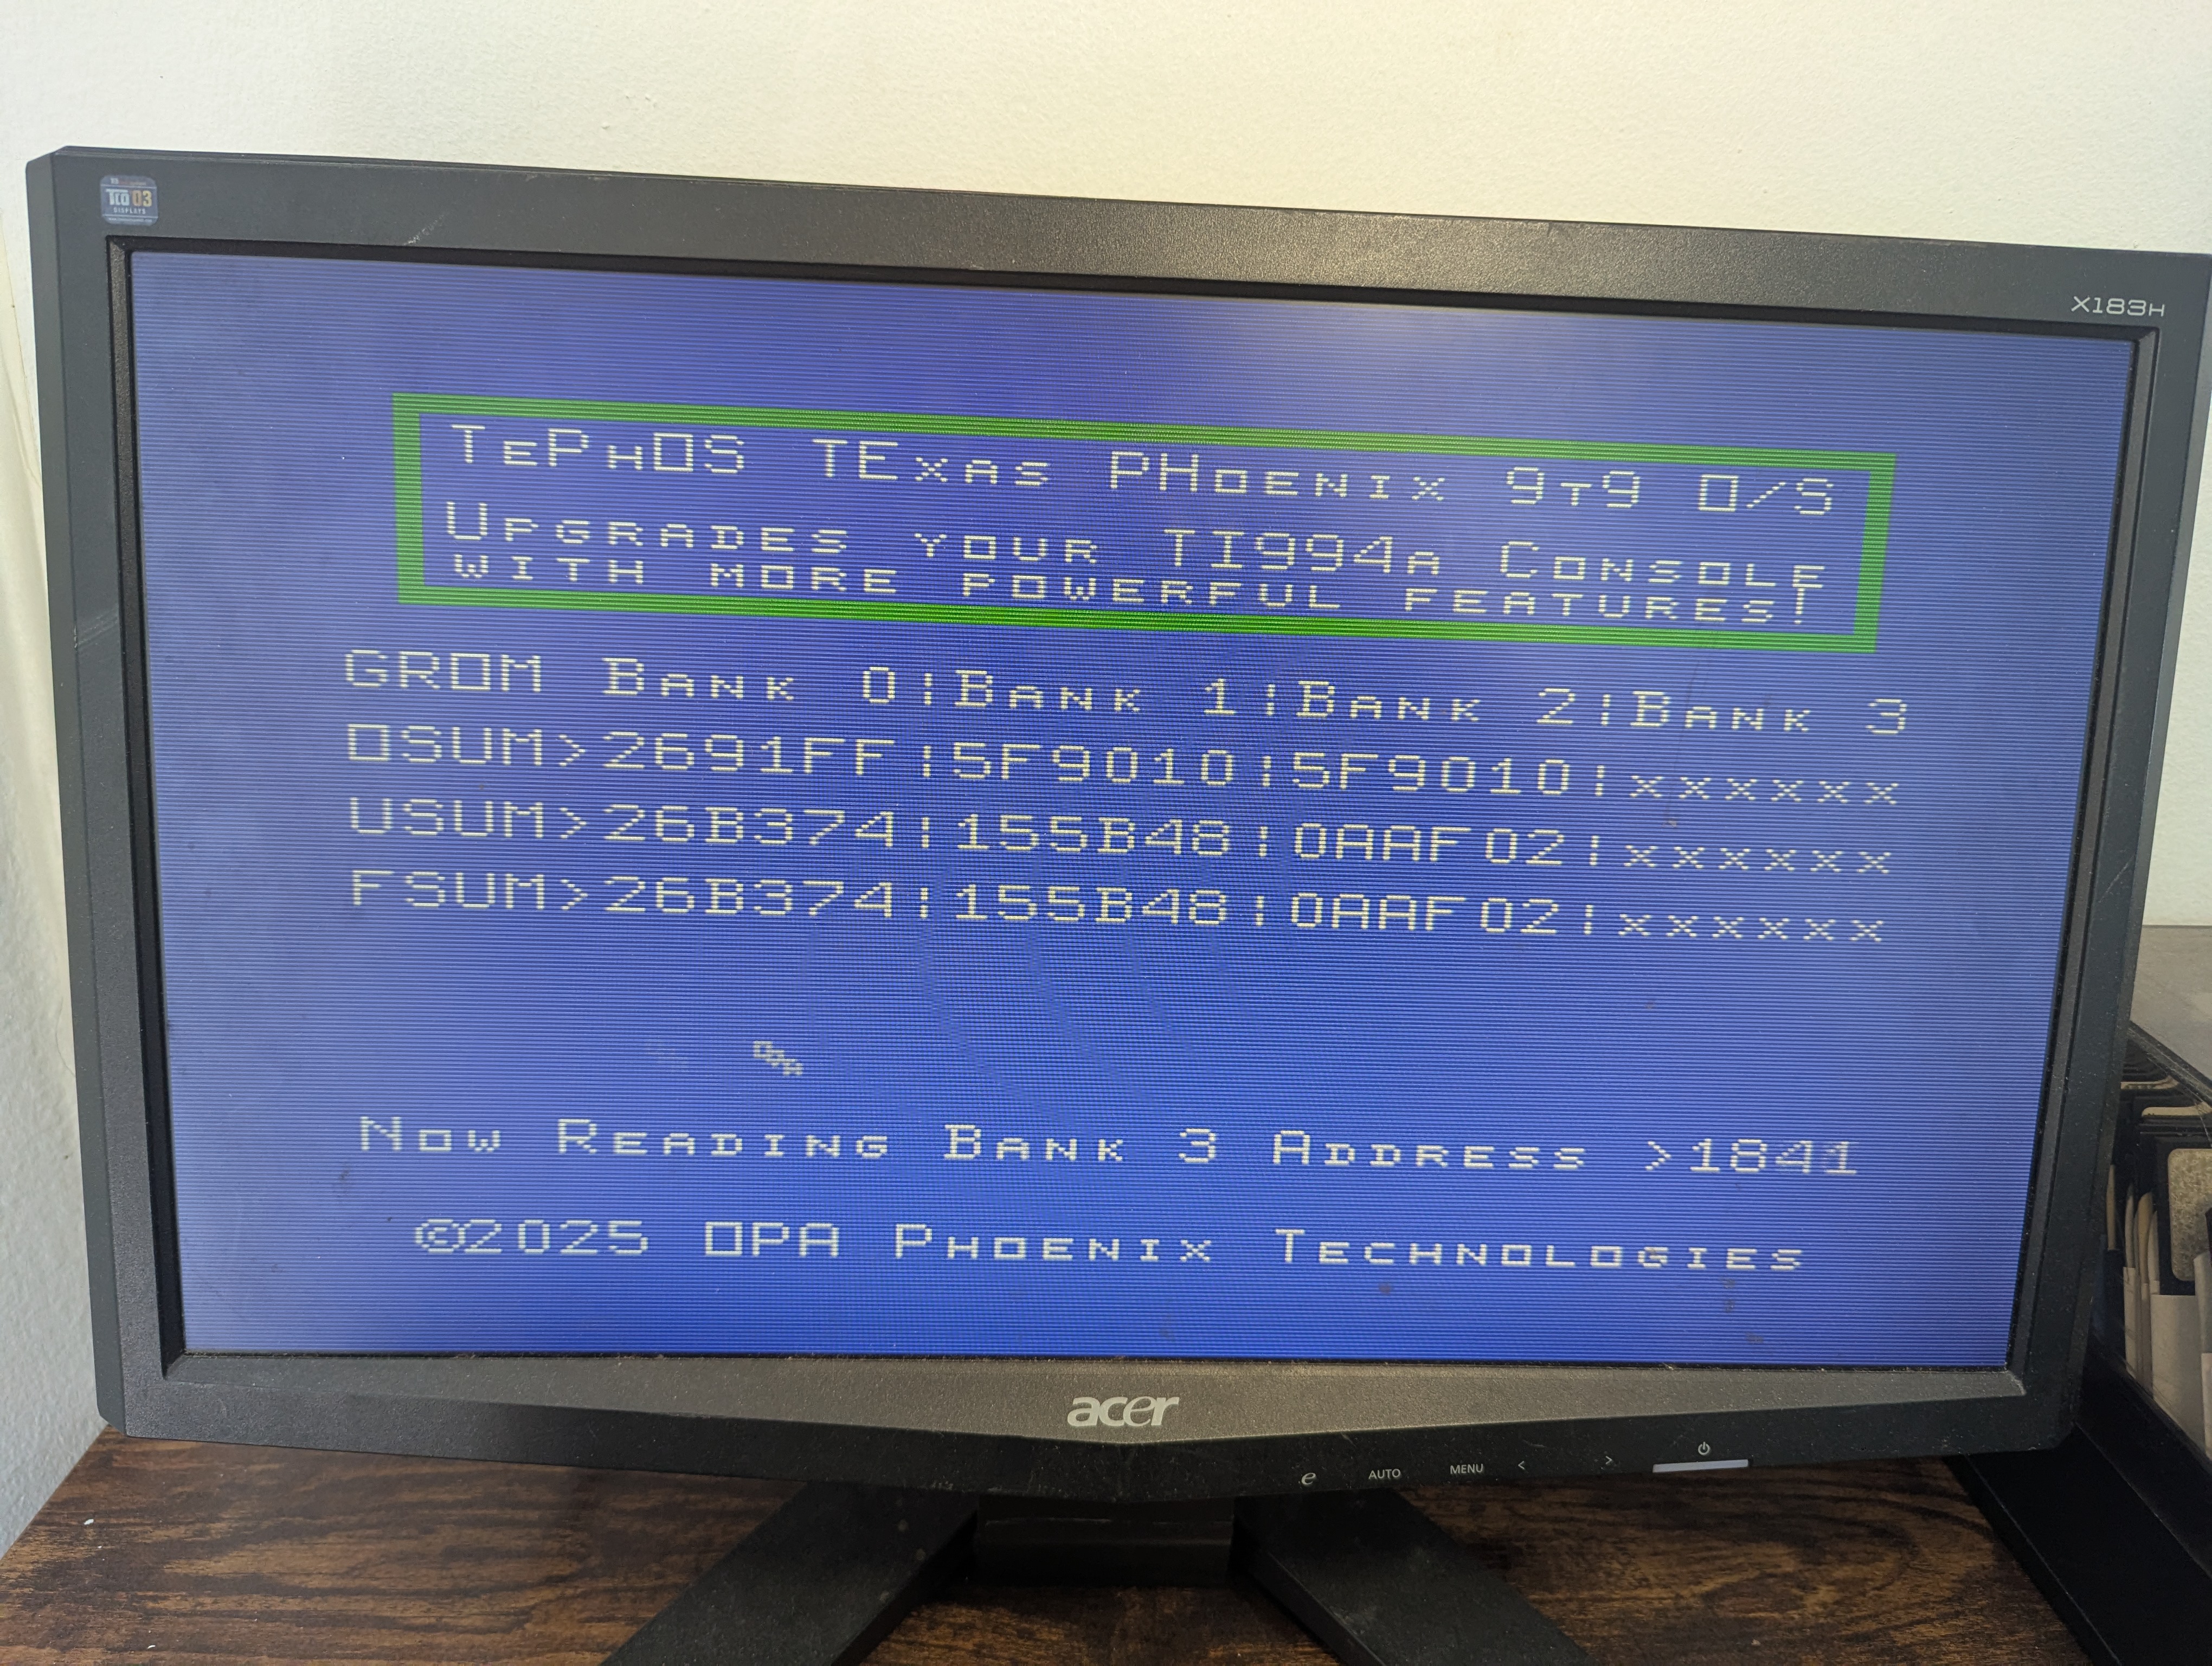
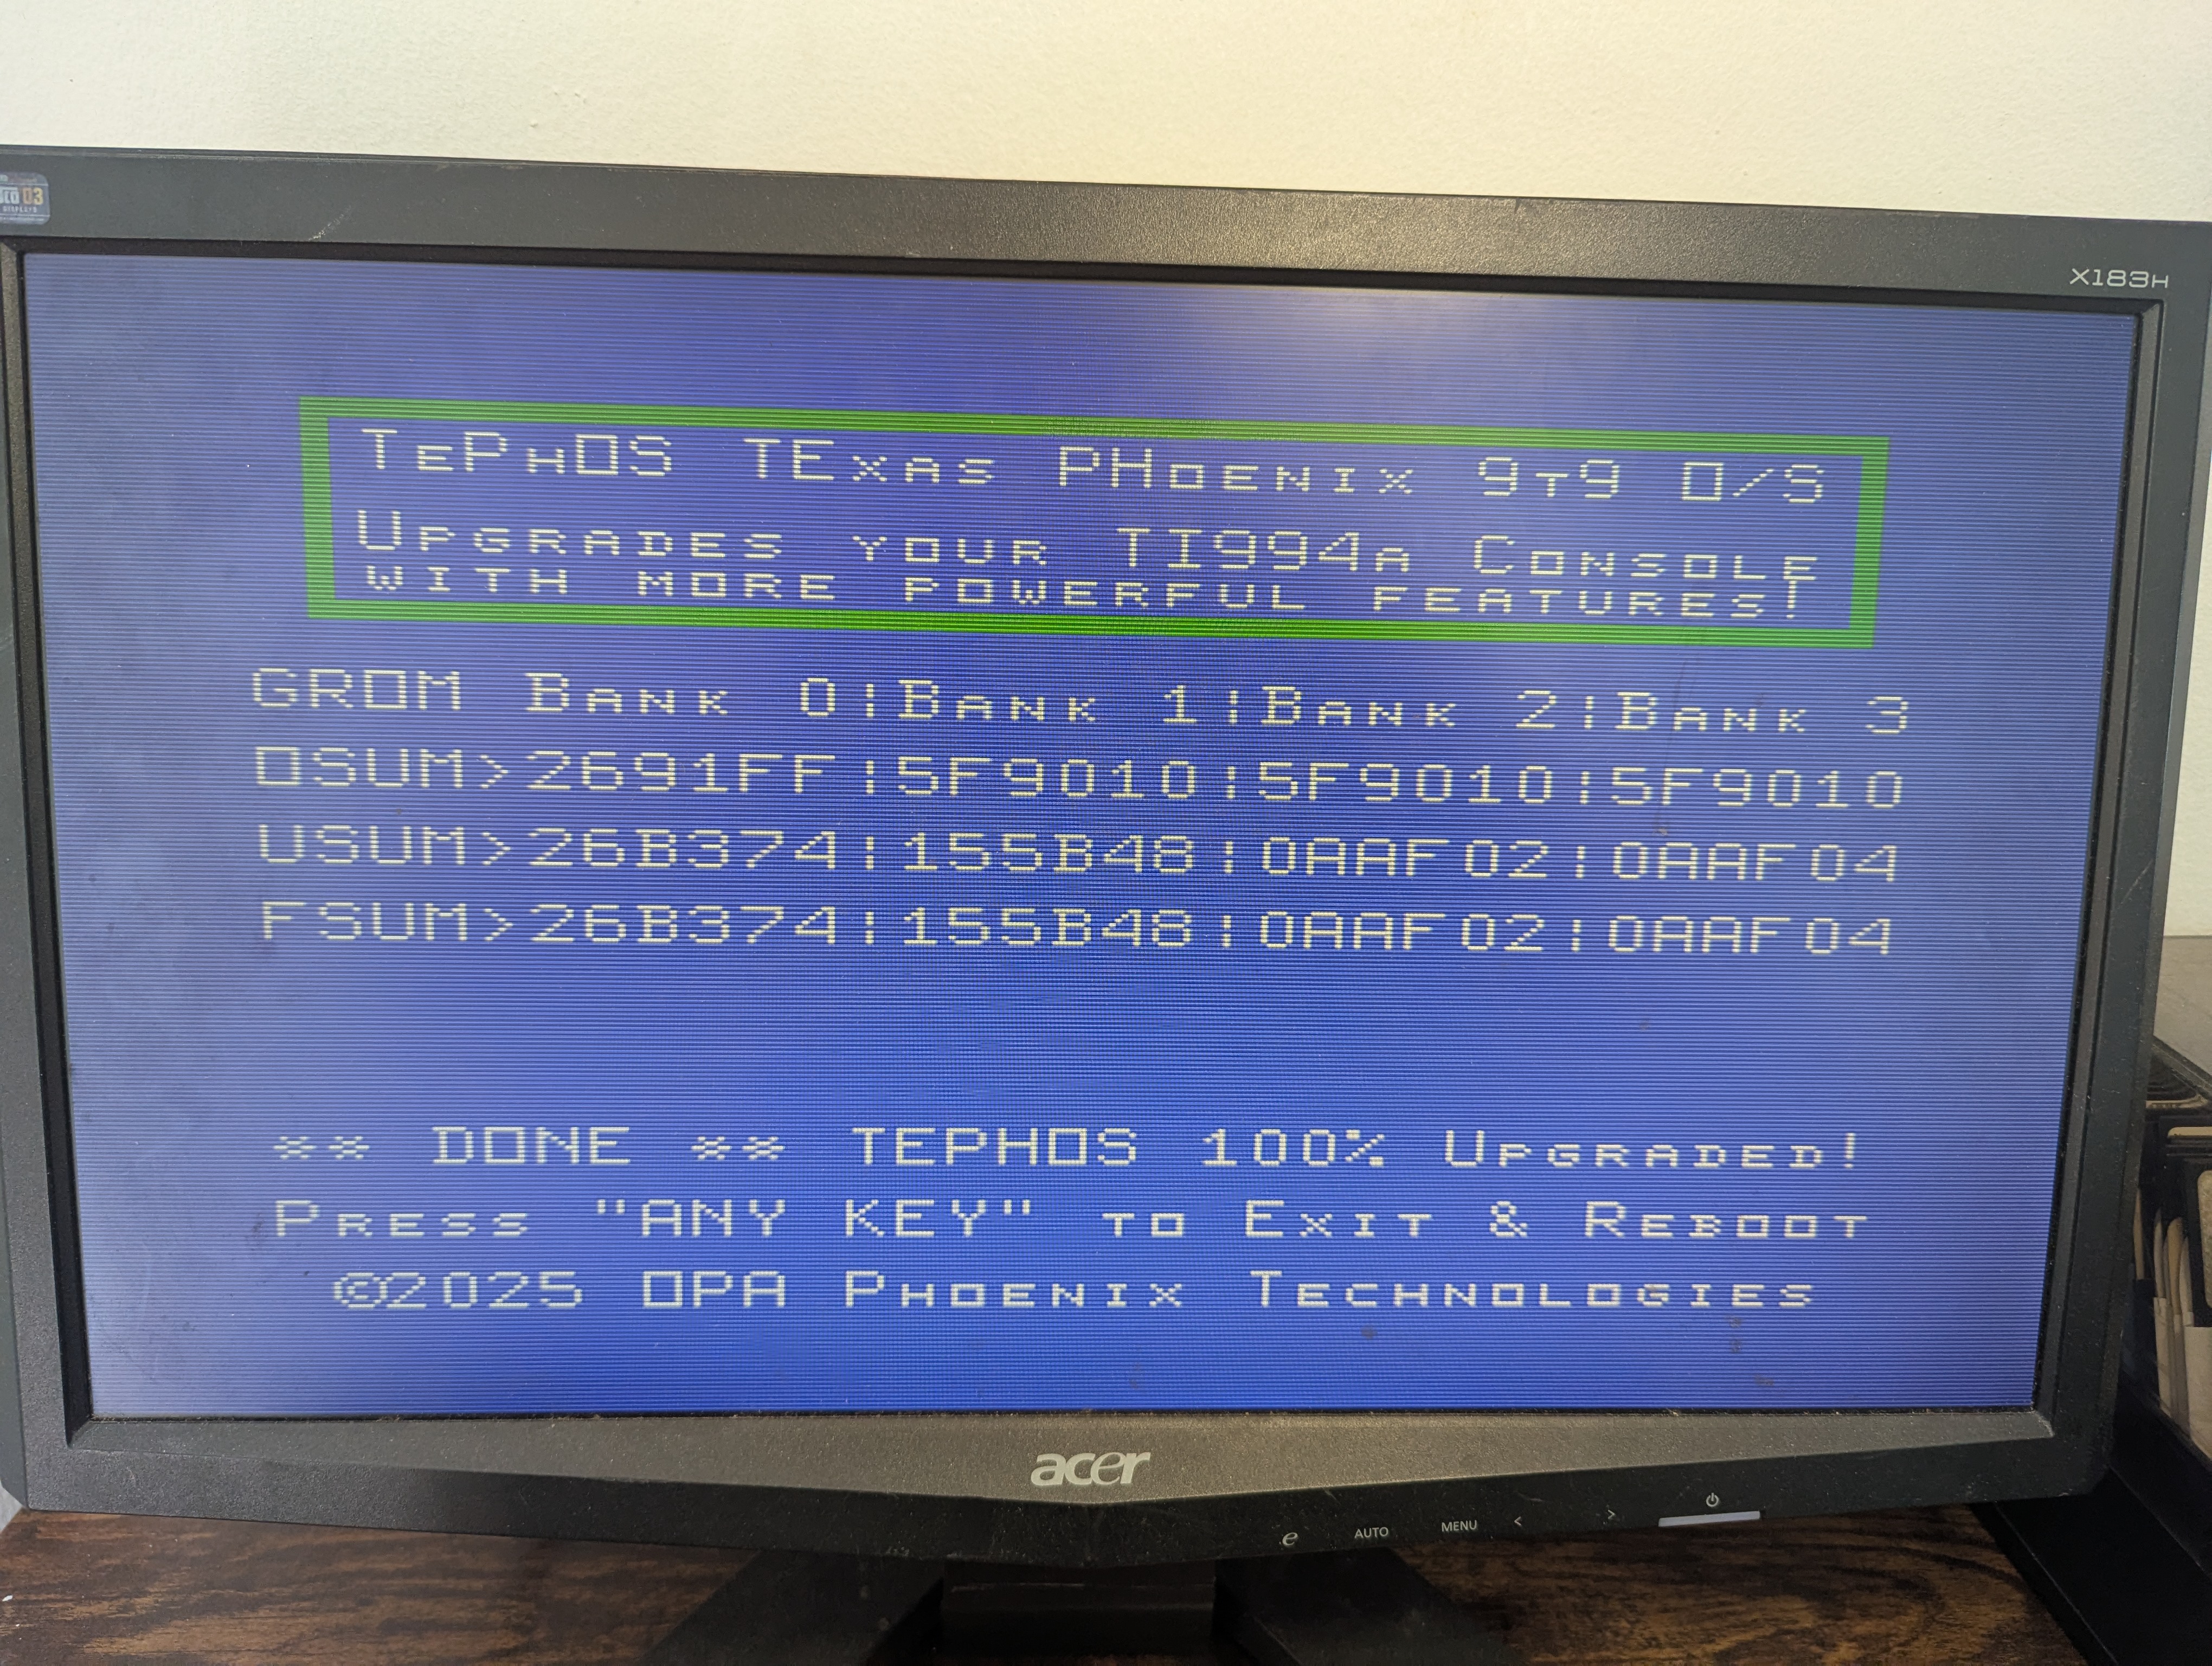
- SIT BACK & RELAX & WAIT Once you typed ‘YES’, there is not much else left to do, just sit back, slip your coffee and relax, the final process will take about FIVE minutes to completely finish upgrading all FOUR banks, and to keep you fully entertained while you wait, you will see a moving OPA sprite, going by and changing color as it reads, loads, writes, tests each block and bank of flash memory, with the screen updating and showing you various checksums. (Maybe in the future we will turn the “progress sprite” display into a little game you can play for the 5 minutes!)
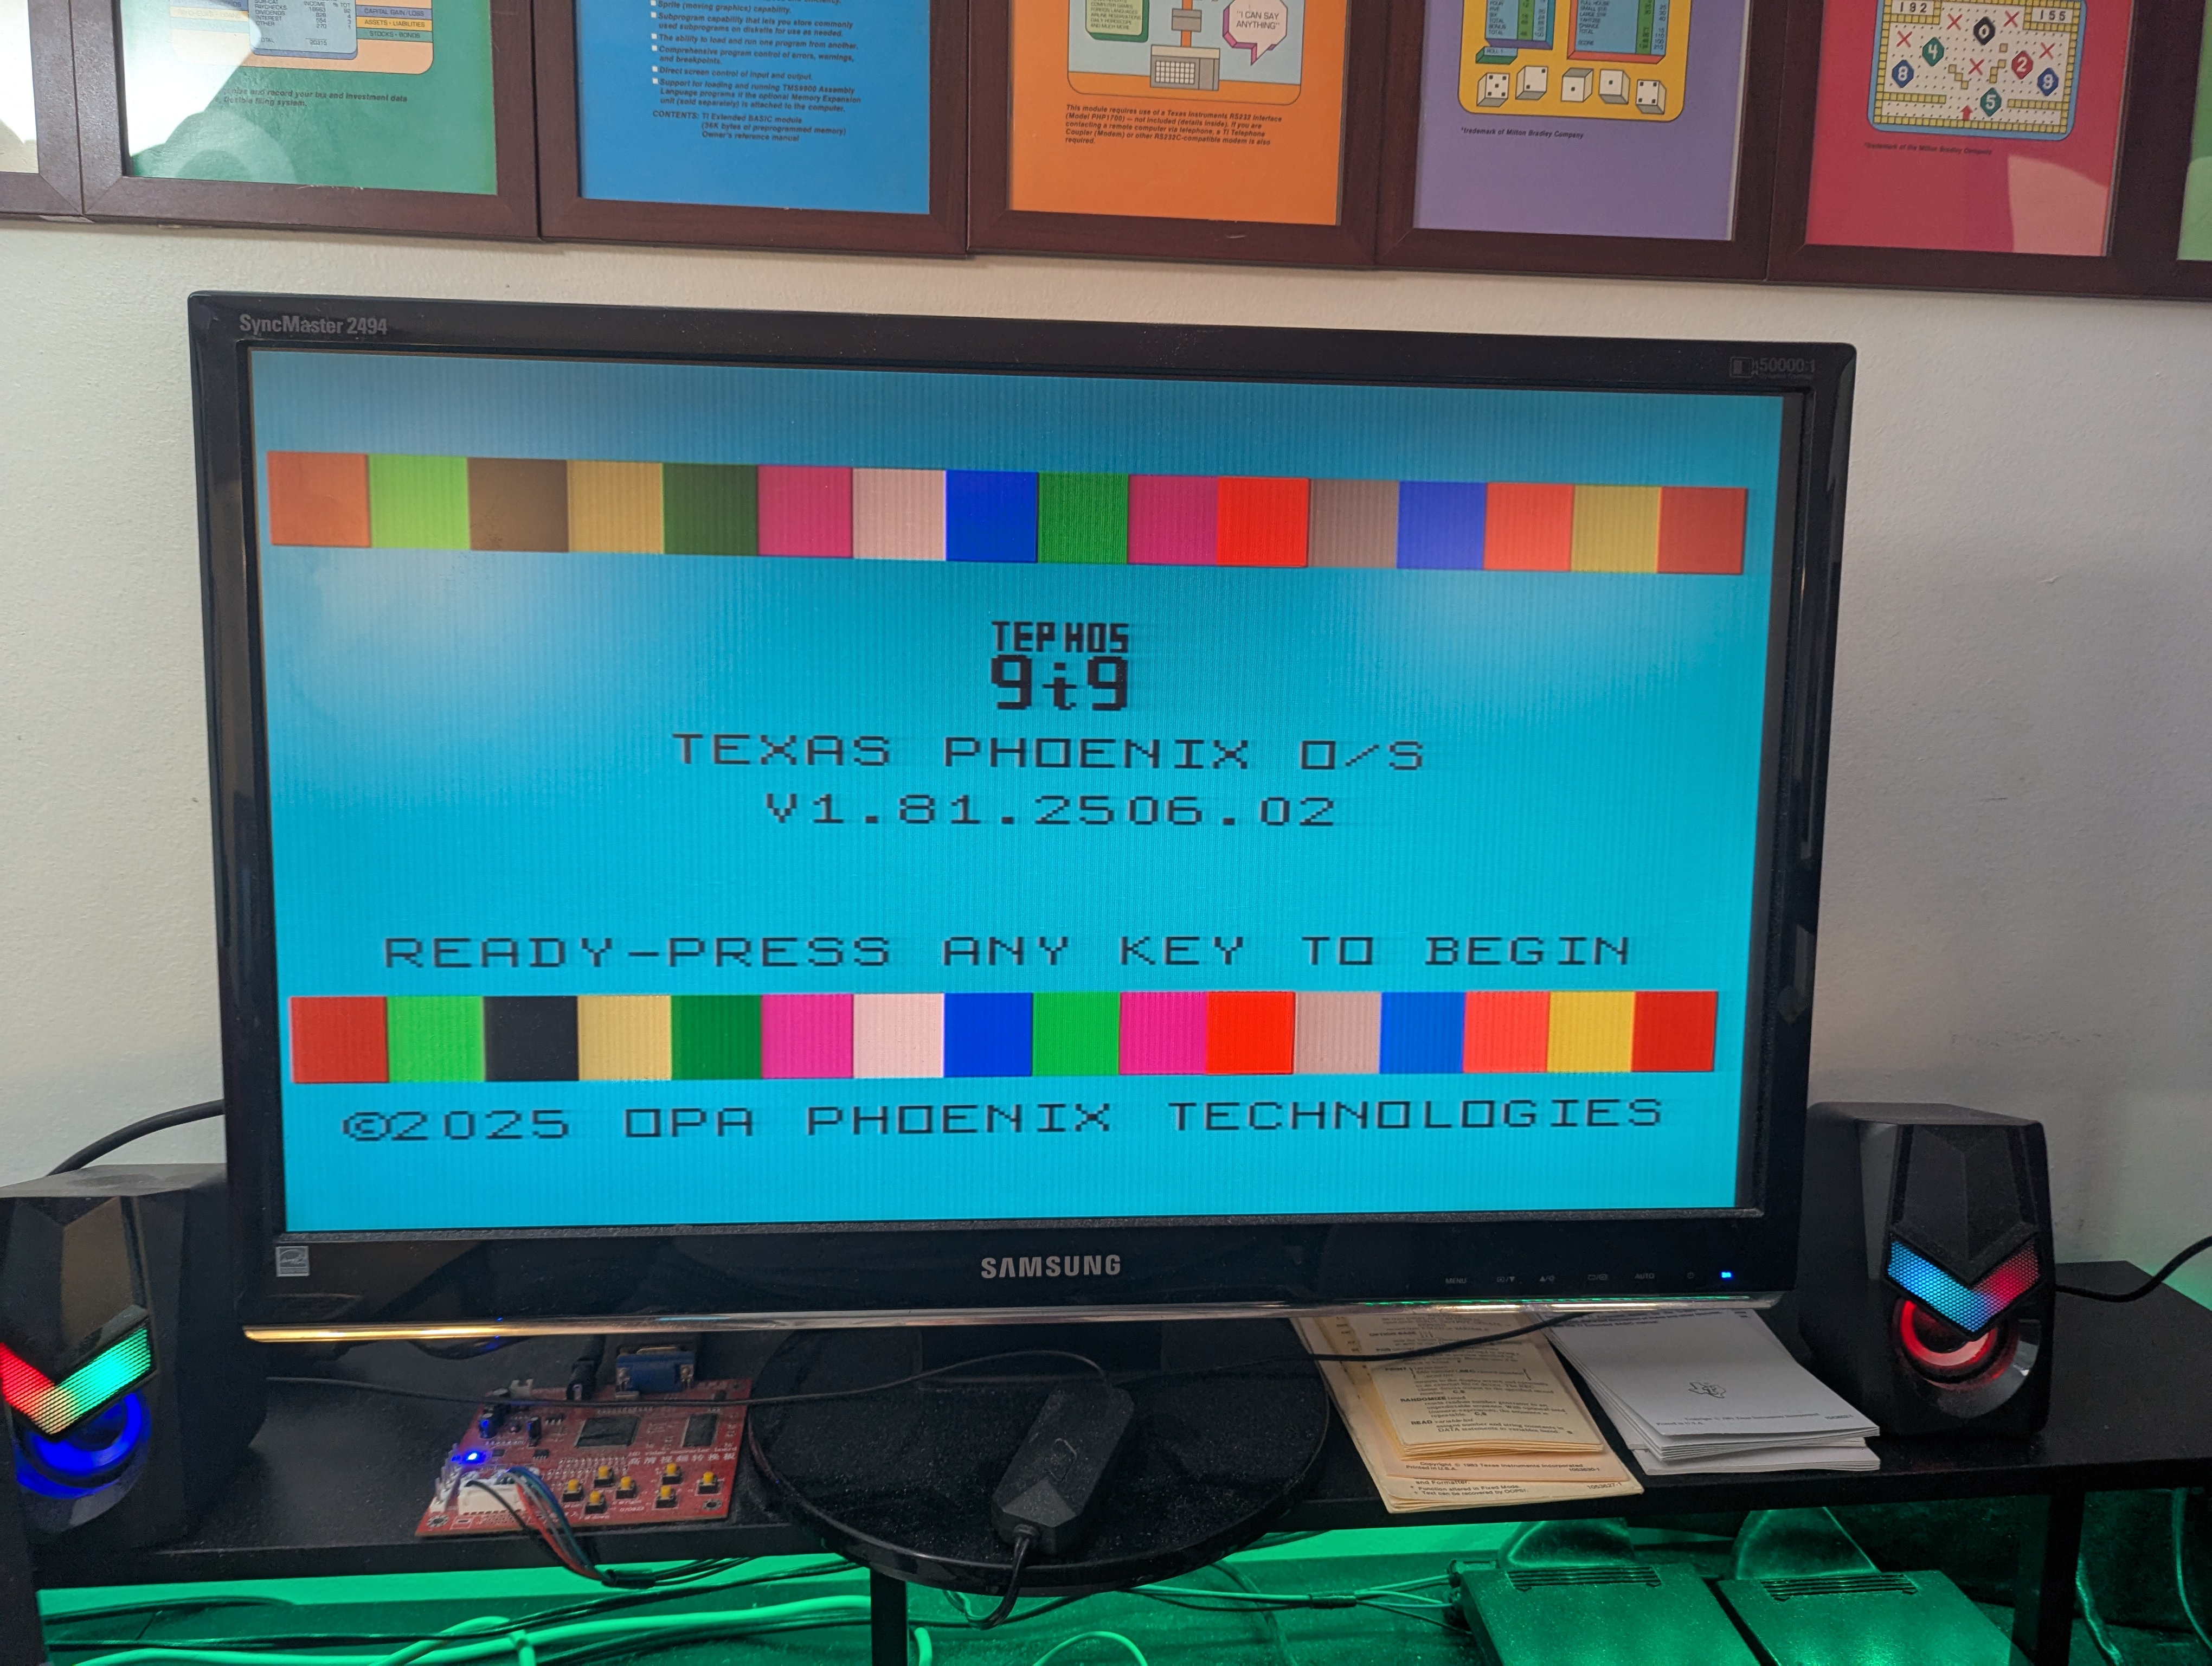
- THAT’S ALL SHE WROTE FOLKS! Once you have relaxed for FIVE minutes while watching the flashing and checking of all FOUR banks, all you need to do is Press Any Key to reboot, and if everything went well, you will then see the new TePhOS 9t9 Title Screen, followed by the upgraded Micro-Manager. 🙂
#2: CARTRIDGE – After copying the Binary files to your SDCARD on Flashrom99 or FinalGrom99, just select 9T9 Tephos Upgrader.

They are to be installed on any valid system device of your own choosing and you are at this point in firmware installation program telling the related modules on what device you have placed the files.
This step will be improved in later revisions of our operating system, allowing for a longer pathname, and an easier way to change to change it at anytime from a system configuration menu, but for now in our current v1.81 beta release, this is easy enough and works for most usage cases.
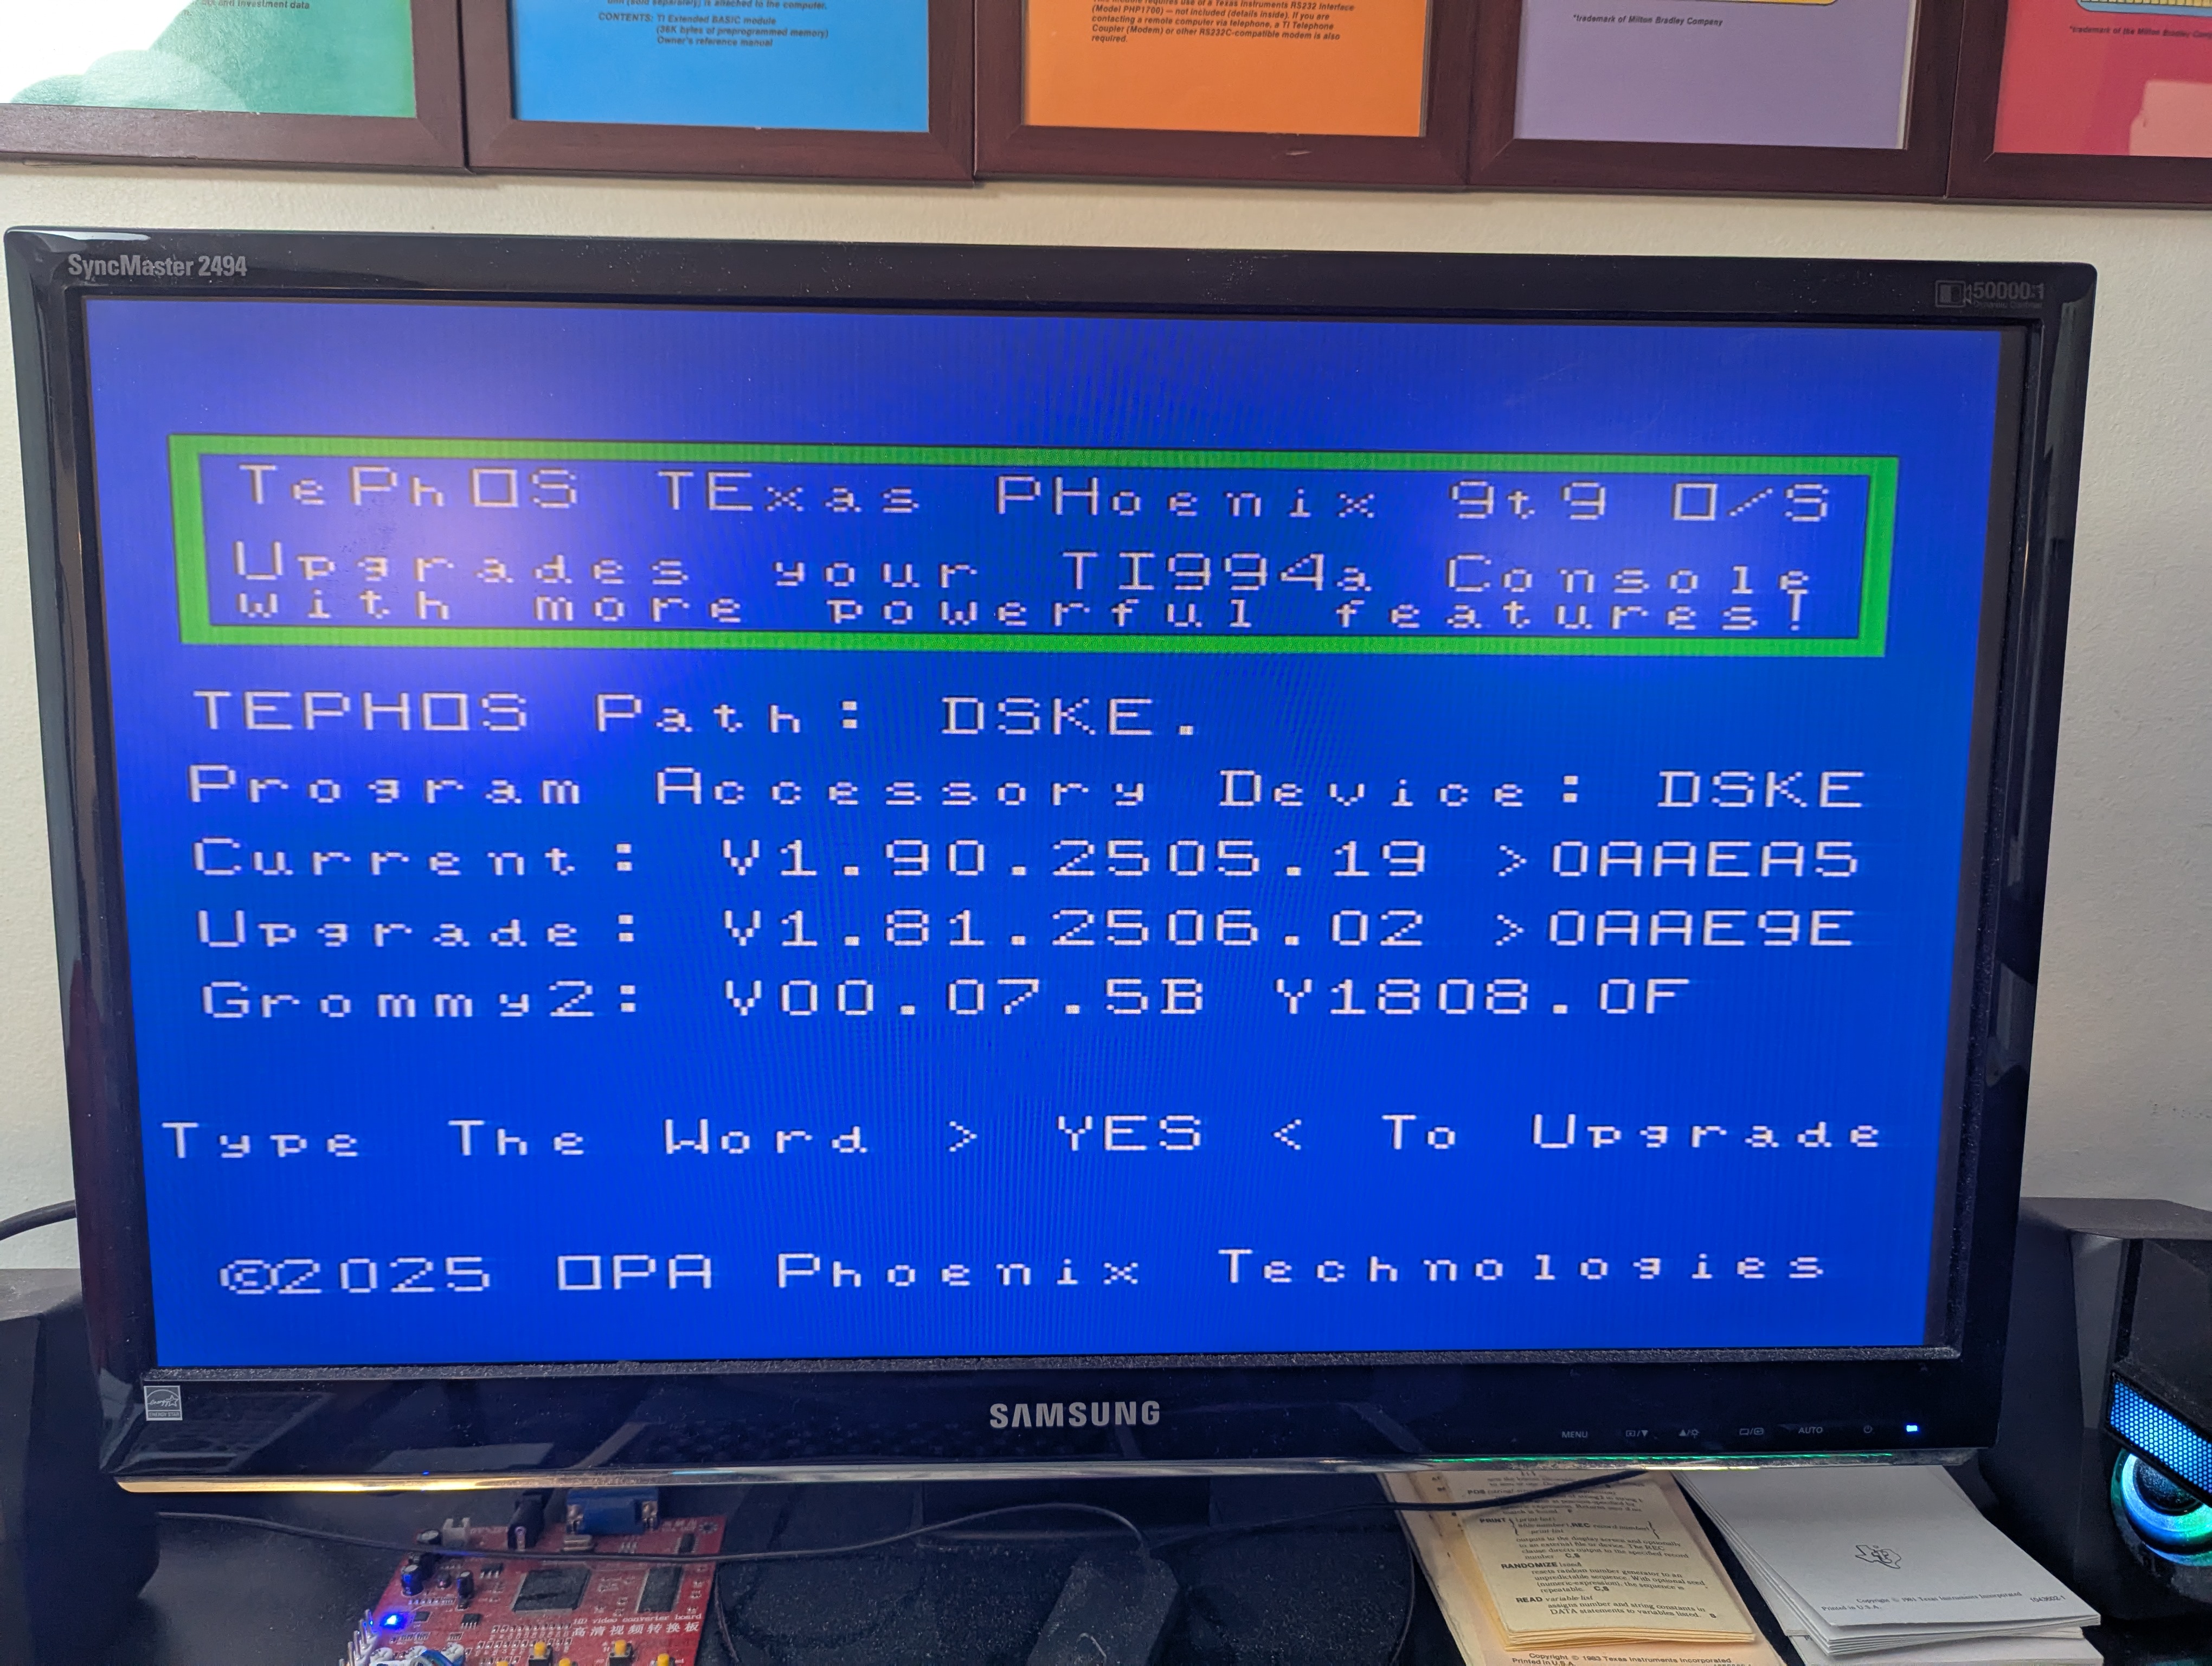

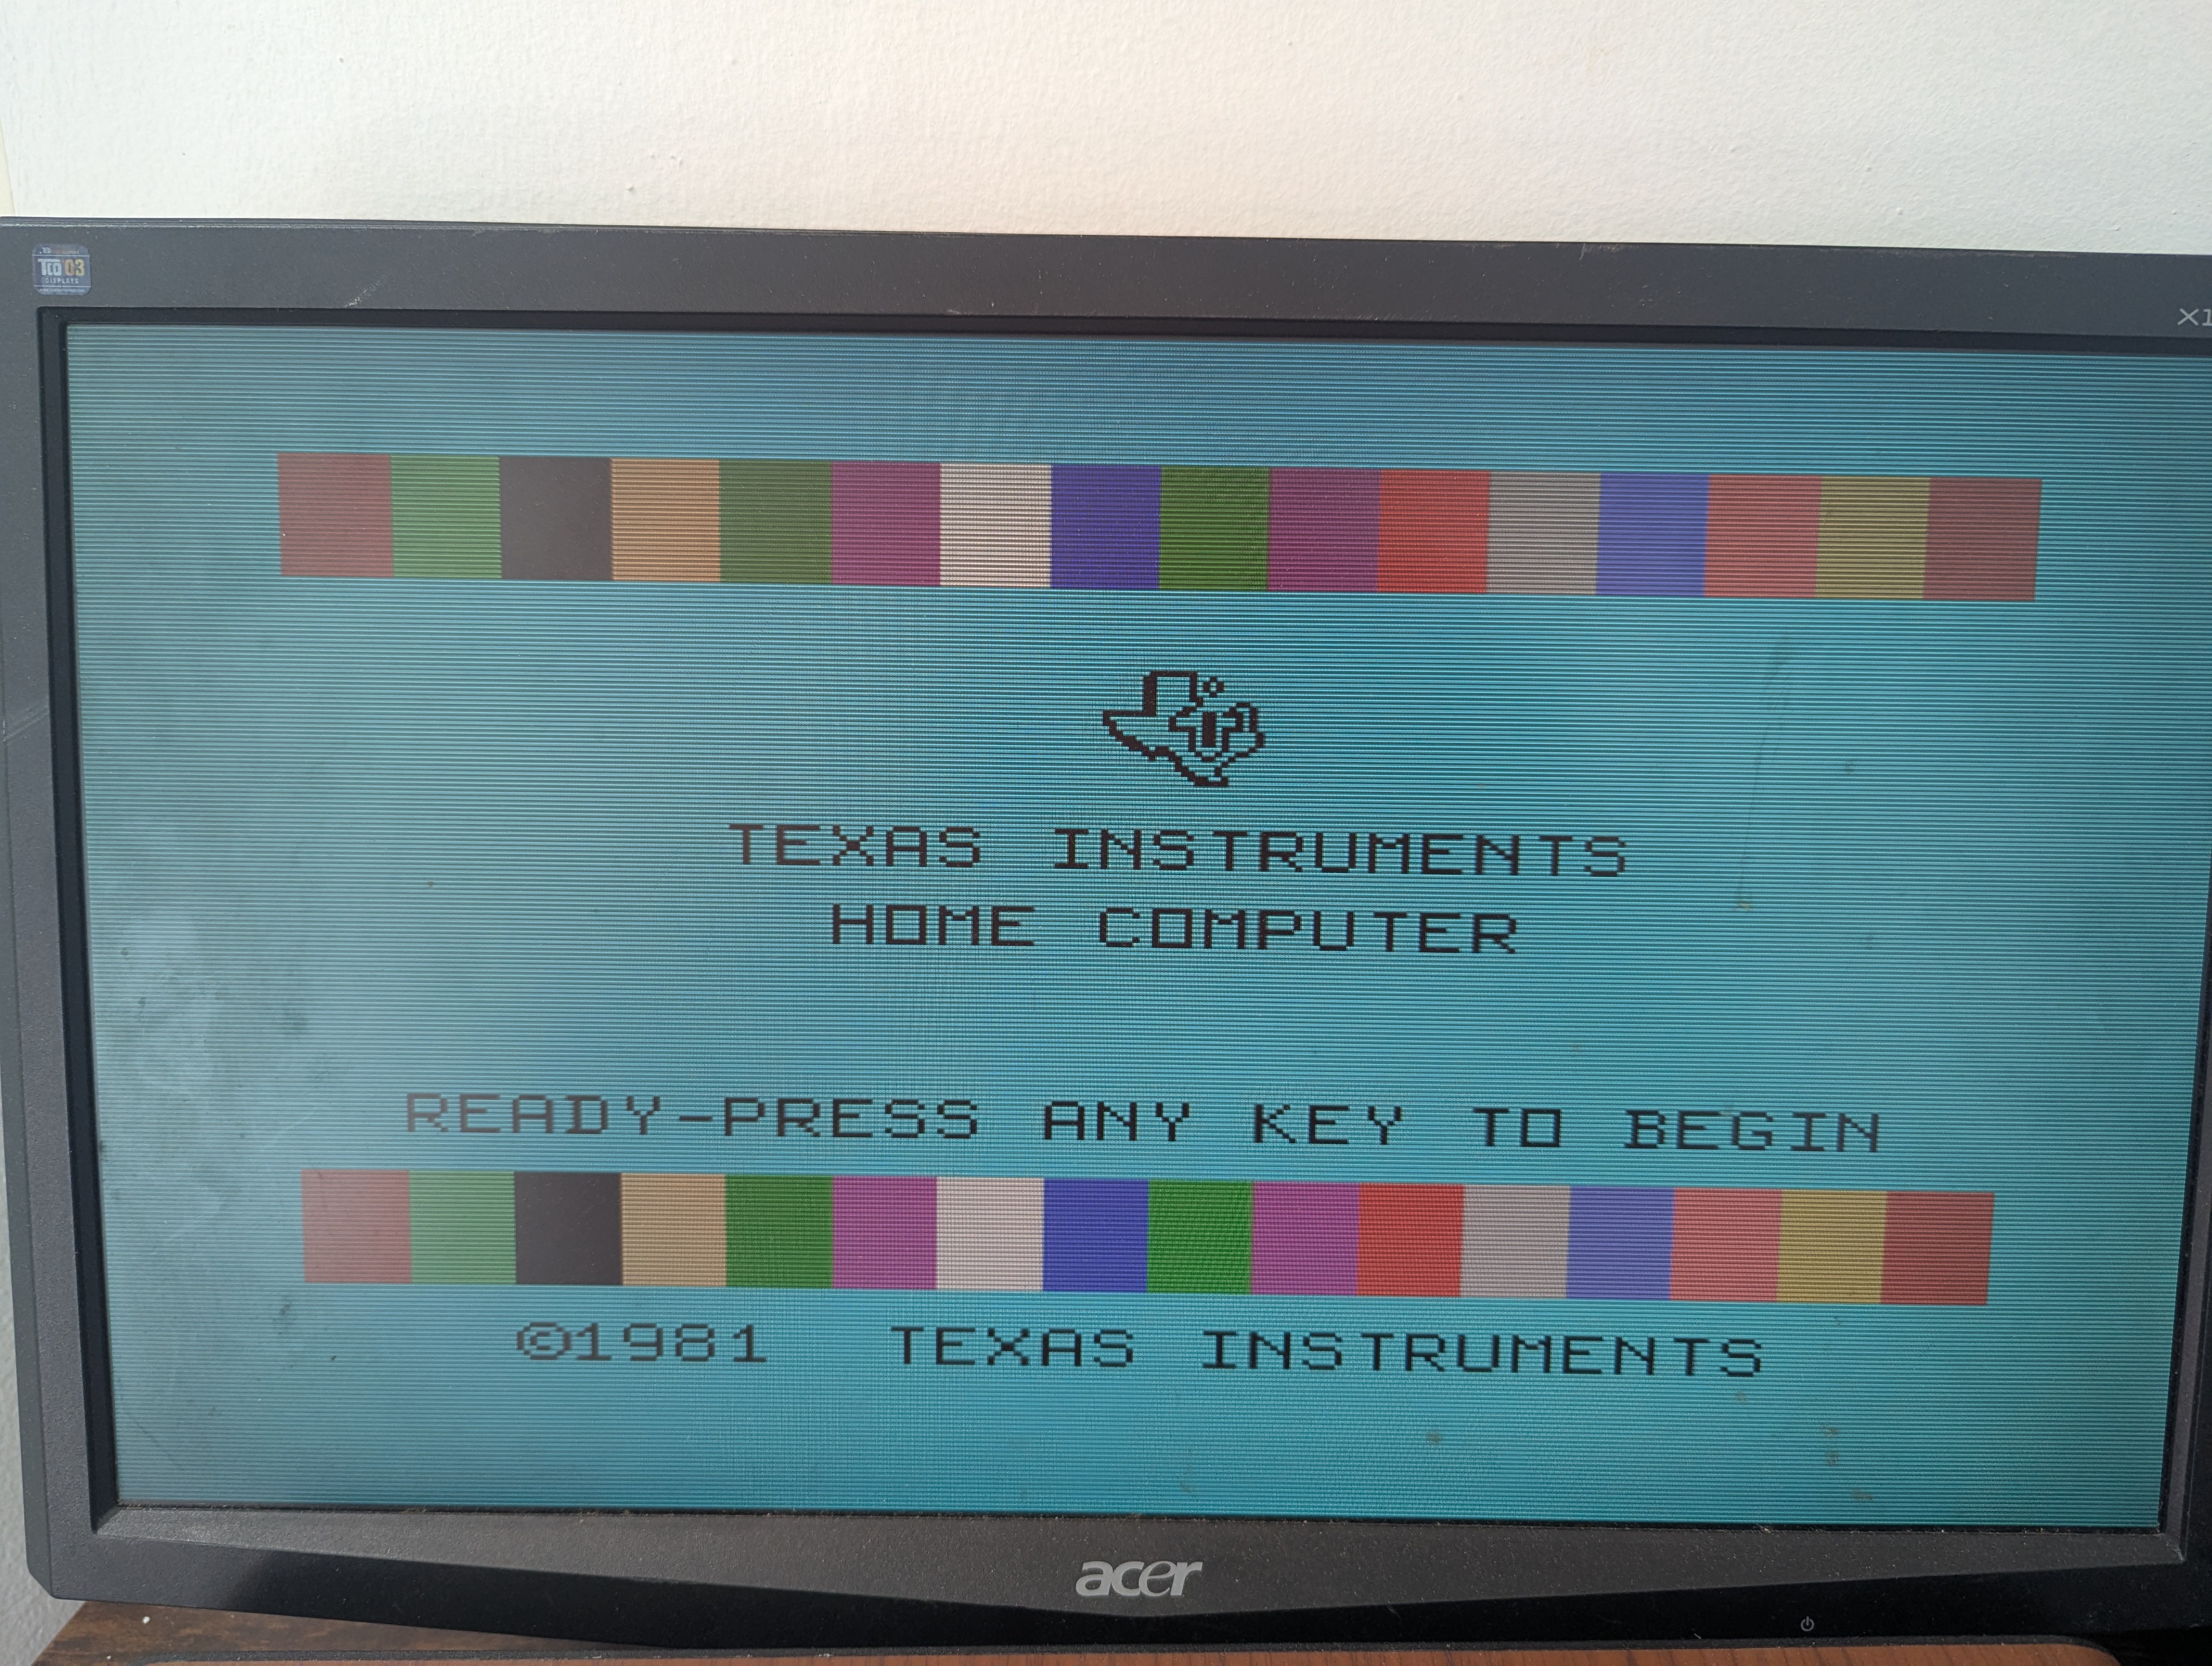
This gives you a time to double-check everything looks OK like the photos. You will notice the first time upgrading from the stock TI99 OS you will see the text HOME COMPUTER displayed with a checksum of >0B5BC3 on the screen, and below that the TePhOS Version and currently with our first beta release it will show V1.81.2506.02 with a checksum of >0AAE9E and then finally your Grommy2 device version will be displayed, which should be V00.07.5B Y1808.0F.